v50 Steam/Premium information for editors
- v50 information can now be added to pages in the main namespace. v0.47 information can still be found in the DF2014 namespace. See here for more details on the new versioning policy.
- Use this page to report any issues related to the migration.
This notice may be cached—the current version can be found here.
Difference between revisions of "v0.31:Menu"
Jump to navigation
Jump to search


Mason11987 (talk | contribs) |
(DF2010 -> v0.31 (1607/2830)) |
||
| (45 intermediate revisions by 12 users not shown) | |||
| Line 1: | Line 1: | ||
| − | {{quality|Exceptional| | + | {{quality|Exceptional|15:16, 18 April 2011 (UTC)}} |
| + | {{av}} | ||
| + | |||
| + | {{Expand Topic}} | ||
| + | |||
| + | The purpose of this page is to help players look up the meaning of user interface elements. See [[Dwarf_fortress_mode#Gameplay_User_Interface|Gameplay User Interface]] for more general information about the UI. | ||
| + | |||
==Main in-game Menu== | ==Main in-game Menu== | ||
| − | [[Image: | + | [[Image:MainMenuv0.31.png|right]] |
| − | * {{K|a}}: View Announcements - Displays recent [[ | + | * {{K|a}}: View Announcements - Displays recent [[Announcement]]s |
* {{K|b}}: Building - [[#Building Menu|Building Menu]] | * {{K|b}}: Building - [[#Building Menu|Building Menu]] | ||
* {{K|r}}: Reports - [[#Combat reports screen|Combat reports screen]] | * {{K|r}}: Reports - [[#Combat reports screen|Combat reports screen]] | ||
| − | * {{K|c}}: View civilizations - Shows [[ | + | * {{K|c}}: View civilizations - Shows [[Civilization]]s that have been met |
* {{K|d}}: Designations - [[#Designate Menu|Designate Menu]] | * {{K|d}}: Designations - [[#Designate Menu|Designate Menu]] | ||
| − | * {{K|o}}: Set Order - [[ | + | * {{K|o}}: Set Order - [[Standing orders|Orders Menu]] |
* {{K|k}}: Look Around | * {{K|k}}: Look Around | ||
* {{K|j}}: Job List - [[#Jobs Screen|Jobs Screen]] | * {{K|j}}: Job List - [[#Jobs Screen|Jobs Screen]] | ||
| − | * {{K|m}}: Military - [[ | + | * {{K|m}}: Military - [[Military interface|Military Interface]] |
* {{K|s}}: Squads - [[#Squads Menu|Squads Menu]] | * {{K|s}}: Squads - [[#Squads Menu|Squads Menu]] | ||
* {{K|N}}: Points/Routes/Notes - [[#Notes Menu|Notes Menu]] | * {{K|N}}: Points/Routes/Notes - [[#Notes Menu|Notes Menu]] | ||
* {{K|w}}: Define Burrows - [[#Burrows Menu|Burrows Menu]] | * {{K|w}}: Define Burrows - [[#Burrows Menu|Burrows Menu]] | ||
* {{K|p}}: Stockpiles - [[#Stockpiles Menu|Stockpiles Menu]] | * {{K|p}}: Stockpiles - [[#Stockpiles Menu|Stockpiles Menu]] | ||
| − | * {{K|i}}: Zones - Place a [[Zone]] | + | * {{K|i}}: Zones - Place a [[Activity zone|Zone]] |
* {{K|q}}: Set Building Tasks/Prefs - | * {{K|q}}: Set Building Tasks/Prefs - | ||
| − | * {{K|R}}: View Rooms/Buildings - View | + | * {{K|R}}: View Rooms/Buildings - View [[Room]]s and [[Building list|Building List]] |
* {{K|t}}: View Items in Buildings | * {{K|t}}: View Items in Buildings | ||
* {{K|v}}: View Units | * {{K|v}}: View Units | ||
| Line 25: | Line 31: | ||
* {{K|Tab}}: Move this menu/map - Moves the menu/map into another arrangement | * {{K|Tab}}: Move this menu/map - Moves the menu/map into another arrangement | ||
* {{K|?}}: Help - [[#Help Screen|Help Screen]] | * {{K|?}}: Help - [[#Help Screen|Help Screen]] | ||
| − | * {{K| | + | * {{K|Esc}}: Options - Set [[Dwarf fortress mode#Options Screen|Options]] |
* {{K|;}}: Movies | * {{K|;}}: Movies | ||
| − | * {{K|D}}: Depot Access - View whether your [[Trade | + | * {{K|D}}: Depot Access - View whether your [[Trade depot]]s can be reached by other civs |
* {{K|Space}}: Resume | * {{K|Space}}: Resume | ||
* {{K|.}}: One-Step | * {{K|.}}: One-Step | ||
| Line 34: | Line 40: | ||
=== Building Menu === | === Building Menu === | ||
| − | [[Image:BuildingMenu2010.png]] | + | [[Image:BuildingMenu2010.png|right]] |
:This menu lists objects/buildings that can be placed. Some require dwarves to have a specific hauling labor set, others require dwarves to have another labor set. | :This menu lists objects/buildings that can be placed. Some require dwarves to have a specific hauling labor set, others require dwarves to have another labor set. | ||
| − | * Armor Stand ({{K|a}}) - Place a built [[Armor | + | * Armor Stand ({{K|a}}) - Place a built [[Armor stand]] (req. [[Furniture hauling]]) |
| − | * Bed ({{K|b}}) - Place a built [[Bed]] (req. Furniture hauling) | + | * Bed ({{K|b}}) - Place a built [[Bed]] (req. [[Furniture hauling]]) |
| − | * Seat ({{K|c}}) - Place a built [[ | + | * Seat ({{K|c}}) - Place a built [[Throne]] (req. [[Furniture hauling]]) |
| − | * Burial Receptacle ({{K|n}}) - Place a built [[Coffin]] (req. Furniture hauling) | + | * Burial Receptacle ({{K|n}}) - Place a built [[Coffin]] (req. [[Furniture hauling]]) |
| − | * Door ({{K|d}}) - Place a built [[Door]] (req. Furniture hauling) | + | * Door ({{K|d}}) - Place a built [[Door]] (req. [[Furniture hauling]]) |
| − | * Floodgate ({{K|x}}) - Place a built [[Floodgate]] (req. Furniture hauling) | + | * Floodgate ({{K|x}}) - Place a built [[Floodgate]] (req. [[Furniture hauling]]) |
| − | * Floor Hatch ({{K|H}}) - Place a built [[Floor | + | * Floor Hatch ({{K|H}}) - Place a built [[Floor hatch]] (req. [[Furniture hauling]]) |
| − | * Wall Grate ({{K|W}}) - Place a built [[Wall | + | * Wall Grate ({{K|W}}) - Place a built [[Wall grate]] (req. [[Furniture hauling]]) |
| − | * Floor Grate ({{K|G}}) - Place a built [[Floor | + | * Floor Grate ({{K|G}}) - Place a built [[Floor grate]] (req. [[Furniture hauling]]) |
| − | * Vertical Bars ({{K|B}}) - Place | + | * Vertical Bars ({{K|B}}) - Place [[Vertical bars]] (req. [[Furniture hauling]]) |
| − | * Floor Bars ({{K|Alt}}+({{K|b}}) - Place | + | * Floor Bars ({{K|Alt}}+({{K|b}}) - Place [[Floor bars]] (req. [[Furniture hauling]]) |
| − | * Cabinet ({{K|f}}) - Place a built [[Cabinet]] (req. Furniture hauling) | + | * Cabinet ({{K|f}}) - Place a built [[Cabinet]] (req. [[Furniture hauling]]) |
| − | * Container ({{K|h}}) - Place a built [[Container]] (req. Furniture hauling) | + | * Container ({{K|h}}) - Place a built [[Container]] (req. [[Furniture hauling]]) |
| − | * Kennels ({{K|k}}) - Construct a [[Kennel]] (req. | + | * Kennels ({{K|k}}) - Construct a [[Kennel]] (req. [[animal training]], [[small animal dissection]] and/or [[trapping]] labor) |
| − | * Farm Plot ({{K|p}}) - Place a [[Farm]] (req. | + | * Farm Plot ({{K|p}}) - Place a [[Farm]] (req. [[Farming (fields)]] labor) |
| − | * Weapon Rack ({{K|r}}) - Place a built [[Weapon | + | * Weapon Rack ({{K|r}}) - Place a built [[Weapon rack]] (req. [[Furniture hauling]]) |
| − | * Statue ({{K|s}}) - Place a built [[Statue]] (req. Furniture hauling) | + | * Statue ({{K|s}}) - Place a built [[Statue]] (req. [[Furniture hauling]]) |
| − | * Table ({{K|t}}) - Place a built [[Table]] (req. Furniture hauling) | + | * Table ({{K|t}}) - Place a built [[Table]] (req. [[Furniture hauling]]) |
| − | * Paved Road ({{K|o}}) - Build a [[Paved | + | * Paved Road ({{K|o}}) - Build a [[Paved road]] (req. [[Architecture]] labor) |
| − | * Dirt Road ({{K|O}}) - Build a [[Dirt | + | * Dirt Road ({{K|O}}) - Build a [[Dirt road]] (req. [[Architecture]] labor) |
| − | * Bridge ({{K|g}}) - Build a [[Bridge]] (req. | + | * Bridge ({{K|g}}) - Build a [[Bridge]] (req. [[Architecture]] labor) |
| − | * Well ({{K|l}}) - Build a [[Well]] (req. | + | * Well ({{K|l}}) - Build a [[Well]] (req. [[Architecture]] labor) |
* Siege Engines ({{K|i}}) | * Siege Engines ({{K|i}}) | ||
** Ballista ({{K|b}}) | ** Ballista ({{K|b}}) | ||
** Catapult ({{K|c}}) | ** Catapult ({{K|c}}) | ||
| − | * Workshops ({{K|w}}) - [[#Workshops Menu|Workshops Menu]] - Menu to build various | + | * Workshops ({{K|w}}) - [[#Workshops Menu|Workshops Menu]] - Menu to build various [[Workshop]]s |
| − | * Furnaces ({{K|e}}) - [[#Furnaces Menu|Furnaces Menu]] - Menu to build various | + | * Furnaces ({{K|e}}) - [[#Furnaces Menu|Furnaces Menu]] - Menu to build various [[Furnace]]s |
| − | * Glass Window ({{K|y}}) - Place a built [[Glass | + | * Glass Window ({{K|y}}) - Place a built [[window|Glass window]] (req. [[Furniture hauling]]) |
| − | * Gem Window ({{K|Y}}) - Create a [[Gem | + | * Gem Window ({{K|Y}}) - Create a [[Gem window]] ('''with job''') |
* Wall/Floor/Stairs ({{K|C}}) | * Wall/Floor/Stairs ({{K|C}}) | ||
| − | ** Wall ({{K|w}}) - Build a [[Wall]] (req. | + | ** Wall ({{K|w}}) - Build a [[Wall]] (req. [[Masonry]]/[[Carpenter]] labor) |
| − | ** Floor ({{K|f}}) - Build a [[Floor]] (req. | + | ** Floor ({{K|f}}) - Build a [[Floor]] (req. [[Masonry]]/[[Carpenter]] labor) |
| − | ** Ramp ({{K|r}}) - Build a [[Ramp]] (req. | + | ** Ramp ({{K|r}}) - Build a [[Ramp]] (req. [[Masonry]]/[[Carpenter]] labor) |
| − | ** Up Stair ({{K|u}}) - Build a [[Up | + | ** Up Stair ({{K|u}}) - Build a [[Up stair]] (req. [[Masonry]]/[[Carpenter]] labor) |
| − | ** Down Stair ({{K|d}}) - Build a [[Down | + | ** Down Stair ({{K|d}}) - Build a [[Down stair]] (req. [[Masonry]]/[[Carpenter]] labor) |
| − | ** Up/Down Stair ({{K|x}}) - Build a [[Stairs|Up/Down Stair]] (req. | + | ** Up/Down Stair ({{K|x}}) - Build a [[Stairs|Up/Down Stair]] (req. [[Masonry]]/[[Carpenter]] labor) |
| − | ** Fortification ({{K|F}}) - Build a [[Fortification]] (req. | + | ** Fortification ({{K|F}}) - Build a [[Fortification]] (req. [[Masonry]]/[[Carpenter]] labor) |
| − | * Trade Depot ({{K|D}}) - Construct a [[Trade | + | * Trade Depot ({{K|D}}) - Construct a [[Trade depot]] |
* Traps/Levers ({{K|T}}) | * Traps/Levers ({{K|T}}) | ||
| − | ** Stone-Fall Trap ({{K|s}}) - Build a [[Stone- | + | ** Stone-Fall Trap ({{K|s}}) - Build a [[Trap|Stone-fall trap]] (req. [[Mechanics]] labor) |
| − | ** Weapon Trap ({{K|w}}) - Build a [[Weapon | + | ** Weapon Trap ({{K|w}}) - Build a [[Weapon trap]] (req. [[Mechanics]] labor) |
| − | ** Lever ({{K|l}}) - Build a [[Lever]] (req. | + | ** Lever ({{K|l}}) - Build a [[Lever]] (req. [[Mechanics]] labor) |
| − | ** Pressure Plate ({{K|p}}) - Build a [[Pressure | + | ** Pressure Plate ({{K|p}}) - Build a [[Pressure plate]] (req. [[Mechanics]] labor) |
| − | ** Cage Trap ({{K|c}}) - Build a [[Cage | + | ** Cage Trap ({{K|c}}) - Build a [[Cage trap]] (req. [[Mechanics]] labor) |
| − | ** Upright Spear/Spike ({{K|S}}) - Build a [[Trap|Upright Spear/Spike]] (req. | + | ** Upright Spear/Spike ({{K|S}}) - Build a [[Trap|Upright Spear/Spike]] (req. [[Mechanics]] labor) |
* Machine Components ({{K|M}}) | * Machine Components ({{K|M}}) | ||
| − | ** Screw Pump ({{K|s}}) - Build a [[Screw | + | ** Screw Pump ({{K|s}}) - Build a [[Screw pump]] (req. [[Mechanics]] labor) |
| − | ** Water Wheel ({{K|w}}) - Build a [[Water | + | ** Water Wheel ({{K|w}}) - Build a [[Water wheel]] (req. [[Mechanics]] labor) |
| − | ** Windmill ({{K|m}}) - Build a [[Windmill]] (req. | + | ** Windmill ({{K|m}}) - Build a [[Windmill]] (req. [[Mechanics]] labor) |
| − | ** Gear Assembly ({{K|g}}) - Build a [[Gear | + | ** Gear Assembly ({{K|g}}) - Build a [[Gear assembly]] (req. [[Mechanics]] labor) |
| − | ** Horizontal Axle ({{K|h}}) - Build a [[Horizontal | + | ** Horizontal Axle ({{K|h}}) - Build a [[axle|Horizontal axle]] (req. [[Mechanics]] labor) |
| − | ** Vertical Axle ({{K|v}}) - Build a [[Vertical | + | ** Vertical Axle ({{K|v}}) - Build a [[axle|Vertical axle]] (req. [[Mechanics]] labor) |
| − | * Support ({{K|S}}) - Construct a [[Support]] ( | + | * Support ({{K|S}}) - Construct a [[Support]] (req. [[Architecture]] labor) |
| − | * Animal Trap ({{K|m}}) - Place an [[Animal | + | * Animal Trap ({{K|m}}) - Place an [[Animal trap]] (with hauling) |
| − | * Restraint ({{K|v}}) - Place a [[Restraint]] (req. Furniture hauling) | + | * Restraint ({{K|v}}) - Place a [[Restraint]] (req. [[Furniture hauling]]) |
| − | * Cage ({{K|j}}) - Place a built [[Cage]] (req. Furniture hauling) | + | * Cage ({{K|j}}) - Place a built [[Cage]] (req. [[Furniture hauling]]) |
| − | * Archery Target ({{K|A}}) - Build an [[Archery | + | * Archery Target ({{K|A}}) - Build an [[Archery target]] (req. [[Architecture]] labor) |
| − | * Traction Bench ({{K|R}}) - Place a [[Traction | + | * Traction Bench ({{K|R}}) - Place a [[Traction bench]] (req. [[Furniture hauling]]) |
==== Workshops Menu ==== | ==== Workshops Menu ==== | ||
| − | *Leather works ({{K|e}}) - Build a | + | [[Image:Workshops Menu.png|right]] |
| − | *Quern ({{K|q}}) - Build a | + | *Leather works ({{K|e}}) - Build a [[Leather works]] (req. [[Leatherworking]] labor) |
| − | *Millstone ({{K|M}}) - Build a | + | *Quern ({{K|q}}) - Build a [[Quern]] (req. [[Milling]] labor) |
| − | *Loom ({{K|o}}) - Build a | + | *Millstone ({{K|M}}) - Build a [[Millstone]] (req. [[Mechanics]] labor) |
| − | * | + | *Loom ({{K|o}}) - Build a [[Loom]] (req. [[Weaving]] labor) |
| − | * | + | *Clothier's Shop ({{K|k}}) - Build a [[Clothier's shop]] (req. [[Clothesmaking]] labor) |
| − | * | + | *Bowyer's Workshop ({{K|b}}) - Build a [[Bowyer's workshop]] (req. [[Crossbow-making]] labor) |
| − | * | + | *Carpenter's Workshop ({{K|c}}) - Build a [[Carpenter's workshop]] (req. [[Carpentry]] labor) |
| − | *Magma Forge ({{K|v}}) - Build a | + | *Metalsmith's Forge ({{K|f}}) - Build a [[Metalsmith's forge]] (req. [[Weaponsmithing]]/[[Armoring]]/[[Blacksmithing]]/[[Metalcrafting]] labor) |
| − | * | + | *Magma Forge ({{K|v}}) - Build a [[Magma forge]] (req. [[Weaponsmithing]]/[[Armoring]]/[[Blacksmithing]]/[[Metalcrafting]] labor) |
| − | * | + | *Jeweler's Workshop ({{K|j}}) - Build a [[Jeweler's workshop]] (req. [[Gem cutting]] or [[Gem setting]] labor) |
| − | * | + | *Mason's Workshop ({{K|m}}) - Build a [[Mason's workshop]] (req. [[Masonry]] labor) |
| − | * | + | *Butcher's Shop ({{K|u}}) - Build a [[Butcher's shop]] (req. [[Butchery]] labor) |
| − | * | + | *Tanner's Shop ({{K|n}}) - Build a [[Tanner's shop]] (req. [[Tanning]] labor) |
| − | *Siege Workshop ({{K|s}}) - Build a | + | *Craftsdwarf's Workshop ({{K|r}}) - Build a [[Craftsdwarf's workshop]] (req. [[Woodcrafting]]/[[Bone carving]]/[[Stonecrafting]] labor) |
| − | * | + | *Siege Workshop ({{K|s}}) - Build a [[Siege workshop]] (req. [[Siege engineering]] labor) |
| − | *Still ({{K|l}}) - Build a | + | *Mechanic's Workshop ({{K|t}}) - Build a [[Mechanic's workshop]] (req. [[Mechanics]] labor) |
| − | * | + | *Still ({{K|l}}) - Build a [[Still]] (req. [[Brewing]] labor) |
| − | *Kitchen ({{K|z}}) - Build a | + | *Farmer's Workshop ({{K|w}}) - Build a [[Farmer's workshop]] (req. [[Plant processing]]/[[Milking]]/[[Cheese making]] labor) |
| − | *Fishery ({{K|h}}) - Build a | + | *Kitchen ({{K|z}}) - Build a [[Kitchen]] (req. [[Cooking]] labor) |
| − | *Ashery ({{K|y}}) - Build an | + | *Fishery ({{K|h}}) - Build a [[Fishery]] (req. [[Fishing]]/[[Fish cleaning]] labor) |
| − | * | + | *Ashery ({{K|y}}) - Build an [[Ashery]] (req. [[Potash making]] or [[Lye making]] labor) |
| − | *Soap | + | *Dyer's Shop ({{K|d}}) - Build a [[Dyer's shop]] (req. [[Dyeing]] labor) |
| − | ==== | + | *Soap Maker's Workshop ({{K|S}}) - Build a [[Soap maker's workshop]] (req. [[Soap making]] labor) |
| − | *Wood Furnce ({{K|w}}) - Build a | + | {{-}} |
| − | *Smelter ({{K|s}}) - Build a | + | |
| − | *Glass Furnace ({{K|g}}) - Build a | + | ==== Furnaces Menu ==== |
| − | *Kiln ({{K|k}}) - Build a | + | [[Image:FurnacesMenu.png|right]] |
| − | *Magma Smelter ({{K|l}}) - Build a | + | *Wood Furnce ({{K|w}}) - Build a [[Wood furnace]] (req. [[Architecture]] labor) |
| − | *Magma Glass Furnace ({{K|a}}) - Build a | + | *Smelter ({{K|s}}) - Build a [[Smelter]] (req. [[Architecture]] and [[Masonry]] labor) |
| − | *Magma Kiln ({{K|n}}) - Build a | + | *Glass Furnace ({{K|g}}) - Build a [[Glass furnace]] (req. [[Architecture]] and [[Masonry]]/[[Metalsmithing]] labor) |
| − | === Combat reports Screen === | + | *Kiln ({{K|k}}) - Build a [[Kiln]] (req. [[Architecture]] and [[Masonry]] labor) |
| − | + | *Magma Smelter ({{K|l}}) - Build a [[Magma smelter]] (req. [[Architecture]] and [[Masonry]] labor) | |
| − | : | + | *Magma Glass Furnace ({{K|a}}) - Build a [[Magma glass furnace]] (req. [[Architecture]] and [[Masonry]]/[[Metalsmithing]] labor) |
| − | + | *Magma Kiln ({{K|n}}) - Build a [[Magma kiln]] (req. [[Architecture]] and [[Masonry]] labor) | |
| − | + | {{-}} | |
| − | + | ||
| − | + | === Combat reports Screen=== | |
| − | + | [[Image:CombatReportsScreen2010.png|right]] | |
| − | + | Hit r to enter the report screen then go through the listing until you find the desired victim. | |
| − | + | ||
| − | + | === Designations Menu === | |
| − | + | [[Image:DesignateMenu2010.png|right]] | |
| − | + | ||
| − | + | The [[Designations Menu]] (accessed by {{K|d}} provides the means to mark tiles with various designations including Mining, Wood Cutting, Plant Gathering, Stone Detailing as well as removing constructions, controlling traffic and other miscellaneous designations. | |
| − | + | ||
| − | |||
| − | |||
| − | |||
| − | |||
| − | |||
| − | |||
| − | |||
| − | |||
| − | |||
| − | |||
| − | |||
| − | |||
| − | |||
| − | |||
| − | |||
| − | |||
| − | |||
| − | |||
| − | |||
===Jobs Screen=== | ===Jobs Screen=== | ||
| − | + | [[Image:JobsScreen2010.png|right|480px]] | |
| + | {{-}} | ||
===Squads Menu === | ===Squads Menu === | ||
| + | [[Image:SquadsMenu2010.png|right]] | ||
| + | :This menu allows you to manage your squads | ||
| + | {{-}} | ||
=== Notes Menu === | === Notes Menu === | ||
| − | *{{K|p}}: Place | + | [[Image:NotesMenu2010.png|right]] |
| − | *{{K|d}}: Delete | + | :Allows the placement of notes, also referred to as “points”. Required to create patrol routes, often used to label levers so you can remember what they are connected to. |
| − | *{{K|n}}: Name | + | *{{K|p}}: Place - Places a note on the cursor |
| − | *{{K|t}}: Note text | + | *{{K|d}}: Delete - Deletes notes on the cursor |
| − | *{{K|c}}: Change symbol selector | + | *{{K|n}}: Name - Name/label the note placed at this point |
| − | *{{K|s}}: Adopt selected symbol | + | *{{K|t}}: Note text - Add additional information for the note |
| − | *{{K|+}}{{K|-}}{{K|*}}{{K|/}} | + | *{{K|c}}: Change symbol selector - Change which part of the symbol is being modified with {{K|+}}{{K|-}}{{K|*}}{{K|/}}, forecolor, backcolor, or symbol. |
| − | *{{K|r}}:Routes – [[#Routes Menu]] | + | *{{K|s}}: Adopt selected symbol - Makes all future notes use the selected options . |
| + | *{{K|+}}{{K|-}}{{K|*}}{{K|/}} - Modify currently selected (using {{K|c}}) part of the symbol | ||
| + | *{{K|r}}:Routes – [[#Routes Menu]] allows linking of Notes/points together to form routes for patrols. | ||
| + | {{-}} | ||
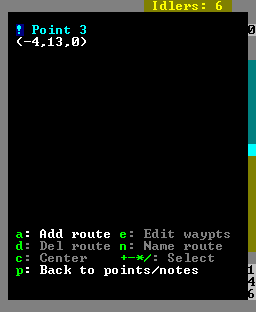
====Routes Menu ==== | ====Routes Menu ==== | ||
| − | *{{K|a}}: Add route | + | [[Image:RoutesMenu2010.png|right]] |
| − | *{{K|e}}: Edit waypts | + | *{{K|a}}: Add route - Create a new route. |
| − | *{{K|d}}: Del route | + | *{{K|e}}: Edit waypts - Edit points that make up the route. |
| − | *{{K|n}}: Name route | + | **{{K|a}}: Add waypt - Add current point to route. |
| − | *{{K|c}}: Center | + | **{{K|d}}: Add waypt - Delete current point from route. |
| − | *{{K|+}}{{K|-}}{{K|*}}{{K|/}} | + | **{{K|p}}: Add waypt - Finish editing route. |
| − | *{{K|p}}: Back to points/notes | + | *{{K|d}}: Del route - Delete currently selected route. |
| + | *{{K|n}}: Name route - Name current route | ||
| + | *{{K|c}}: Center - Center on route. | ||
| + | *{{K|+}}{{K|-}}{{K|*}}{{K|/}} - Select different routes | ||
| + | *{{K|p}}: Back to points/notes - Return to [[#Notes Menu|Notes menu]] | ||
| + | {{-}} | ||
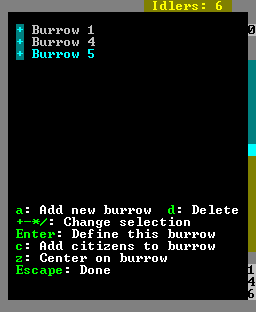
=== Burrows Menu === | === Burrows Menu === | ||
| − | *{{K|a}}: Add new burrow | + | [[Image:BurrowsMenu2010.png|right]] |
| − | *{{K|d}}: | + | :This menu allows the creation and use of Burrows, which help to organize where dwarves are allowed to move/work |
| − | *{{K|+}}{{K|-}}{{K|*}}{{K|/}}: Change selection | + | *{{K|a}}: Add new burrow - Create a new burrow |
| − | *{{K|Enter}}: Define this burrow | + | *{{K|d}}: Delete - Delete currently selected burrow |
| − | *{{K|c}}: Add citizens to burrow | + | *{{K|+}}{{K|-}}{{K|*}}{{K|/}}: Change selection - Switch burrows |
| − | *{{K|z}}: Center on burrow | + | *{{K|Enter}}: Define this burrow - Select areas that make up burrow, multiple areas can be created. |
| − | *{{K| | + | **{{K|c}}: Change symbol selector - Change which part of the symbol is being modified with {{K|+}}{{K|-}}{{K|*}}{{K|/}}, forecolor, backcolor, or symbol. |
| + | **{{K|+}}{{K|-}}{{K|*}}{{K|/}} - Modify currently selected (using {{K|c}}) part of the symbol | ||
| + | *{{K|c}}: Add citizens to burrow - Allows you to select which citizens are restricted to this burrow. | ||
| + | *{{K|z}}: Center on burrow | ||
| + | *{{K|Esc}}: Done | ||
| + | {{-}} | ||
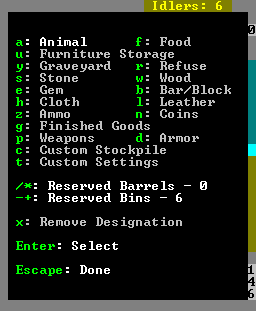
=== Stockpiles Menu === | === Stockpiles Menu === | ||
| + | [[Image:StockpilesMenu2010.png|right]] | ||
| + | :Creates stockpiles, dwarves will place items in the appropriate stockpile if they have the correct hauling labor. | ||
| + | *{{K|a}}: Animal - Stores animals in cages/traps, empty cages/traps | ||
| + | *{{K|f}}: Food - Stores food and food by-products (Meat/Fish/Plants/Drinks/Cheese/Seeds/Leaves/Milled plants/Fat/Blood/Lye/ect.) | ||
| + | *{{K|u}}: Furniture Storage - Stores furniture and siege ammo | ||
| + | *{{K|y}}: Graveyard - Stores dead dwarves | ||
| + | *{{K|r}}: Refuse - Stores garbage/dead animals/bones/skulls/shells | ||
| + | *{{K|s}}: Stone - Stores stone/ore | ||
| + | *{{K|w}}: Wood - Stores wood | ||
| + | *{{K|e}}: Gem - Stores rough/cut gems | ||
| + | *{{K|b}}: Bar/Block - Stores bars (Metal/Coal/Potash/Ash/Pearlash/Soap), and Blocks (Stone/Glass) | ||
| + | *{{K|h}}: Cloth - Stores cloth/thread | ||
| + | *{{K|l}}: Leather - Stores leather | ||
| + | *{{K|z}}: Ammo - Stores Bolts/Arrows/Blowdarts | ||
| + | *{{K|n}}: Coins - Stores coins | ||
| + | *{{K|g}}: Finished Goods - Stores finished goods (chains/crafts/clothing (not armor)/splints/crutches/more) | ||
| + | *{{K|p}}: Weapons - Stores weapons/trap components | ||
| + | *{{K|d}}: Armor - Stores armor | ||
| + | *{{K|c}}: Customer Stockpile - Build custom stockpile (define with {{K|t}}) | ||
| + | *{{K|t}}: Custom Settings - Define custom stockpile | ||
| + | *{{K|/}}{{K|*}}: Reserved Barrels - Set the number of barrels that will be reserved for workshop use (such as the [[Still]]). | ||
| + | *{{K|-}}:{{K|+}}: Reserved Bins - Set the number of bins that will be reserved for workshop use. | ||
| + | *{{K|x}}: Remove Designation - Remove stockpiles | ||
| + | *{{K|Enter}}: Select - Place start/end corner of stockpile. | ||
| + | |||
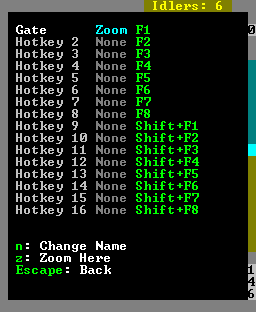
=== Hot Keys Menu === | === Hot Keys Menu === | ||
| + | [[Image:HotKeysMenu2010.png|right]] | ||
| + | :Allows the editing of hotkeys. Pressing a hotkey, F1-F8 or Shift F1-F8 zooms to that location. | ||
| + | *{{K|F#}}: Select line F# | ||
| + | *{{K|Shift}}+{{K|F#}}: Select line Shift+F# | ||
| + | *{{K|n}}: Change Name - Name this hotkey | ||
| + | *{{K|z}}: Zoom Here - Set screen to zoom the the current location when selected hotkey is pressed. | ||
| + | {{-}} | ||
=== Nobles Screen === | === Nobles Screen === | ||
| + | [[Image:NoblesScreen2010.png|right|480px|225px]] | ||
| + | :In this screen various [[nobles]] can be assigned/removed. See the [[nobles]] article for details on nobles, their requirements/demands/mandates. | ||
| + | *{{K|Enter}}: View Unit/Fill Vacancy - Assigns a unit to the position if it's empty, otherwise opens the View screen for that unit. | ||
| + | *{{K|r}}: Replace - Replace the current position if possible, or place if empty. | ||
| + | *{{K|s}}: Settings - Only available for the [[broker]] | ||
| + | {{-}} | ||
=== Status Screen === | === Status Screen === | ||
| + | [[Image:StatusScreen2010.png|right|480px]] | ||
| + | :Shows basic Fortress status. | ||
| + | *A - [[#Animals Screen|Animals]] | ||
| + | *B - [[#Kitchen Screen|Kitchen]] | ||
| + | *C - [[#Stone Screen|Stone]] | ||
| + | *D - [[#Stocks Screen|Stocks]] | ||
| + | *E - [[#Health Screen|Health]] | ||
| + | *F - [[#Justice Screen|Justice]] | ||
| + | *G - Date - Day Month, Year, Early/Middle/Late Season - [[Trade]] caravans arrive late in the month. Elves/Humans/Dwarves : Spring/Summer/Autumn | ||
| + | *H: Summary of your wealth, requires Broker with Appraisal skill to see - More wealth often leads to larger groups of [[immigrants]], and [[siege]]s. The wealth of unground structures you can't see is listed here. “?” at the end of a value means you haven't had your bookkeep keep records precise enough to know the exact value yet. | ||
| + | *I: How much wealth you have acquired through trade, or traded away (Import/Export) | ||
| + | *J: How much food you have. Other contains prepared meals, as well as some inedible plants. | ||
| + | *{{K|←}}{{K|→}} - Move sub-menu | ||
| + | *{{K|Enter}} - Select sub-menu | ||
| + | {{-}} | ||
| + | ==== Animals Screen ==== | ||
| + | [[Image:AnimalsScreen2010.png|right|480px]] | ||
| + | :This shows information about all tame animals at your fortress. | ||
| + | *A: Animal type. Stray Animals can be toggled to become pets, Tame animals are not hostile to your dwarves. | ||
| + | *B: Gender: Amulet is Female, Bag (circle with arrow) is male. | ||
| + | *C: Who owns the animal. Animals marked unavailable can't be adopted. Animals marked “Ready for Slaughter will be slaughtered by a butcher at a butcher's shop. Cats are marked as Uninterested and can't be set as available, cats will adopt dwarves themselves. | ||
| + | *{{K| ↓}}{{K|↑}} - Move between animals | ||
| + | *{{K|Enter}} - Toggle pet availability (not possible on untamed or cats) | ||
| + | *{{K|b}} - Slaughter | ||
| + | {{-}} | ||
| + | ==== Kitchen Screen ==== | ||
| + | [[Image:KitchenScreen2010.png|right|480px]] | ||
| + | :This screen allows you to control what food is processed in which manner. | ||
| + | *A: Type of food | ||
| + | *B: Count for that food. “?” at the end of a value means you haven't had your bookkeep keep records precise enough to know the exact value yet. | ||
| + | *C: Whether a food is available to be cooked if possible. Blue=Yes/Red=No | ||
| + | *D: Whether a food is available to be brewed if possible. Blue=Yes/Red=No | ||
| + | *{{K| ↓}}{{K|↑}} - Move between food items | ||
| + | *{{K|c}} - Toggle cook. | ||
| + | *{{K|b}} - Toggle brew. | ||
| + | {{-}} | ||
| + | |||
| + | ==== Stone Screen ==== | ||
| + | [[Image:StoneScreen2010.png|right|480px]] | ||
| + | :This screen lets you restrict usage of stone to specific tasks. All possible stones are listed here. | ||
| + | *A: Type of Stone/ore/bar. | ||
| + | *B: Various reactions that this item is a part of (<b>these can be selected for more information</b>) | ||
| + | *{{K|Enter}} - Mark stone economic/non-economic | ||
| + | {{-}} | ||
| + | ==== Stocks Screen ==== | ||
| + | [[Image:StocksScreen2010.png|right|480px]] | ||
| + | :This screen lists every item in your fortress. | ||
| + | *A: General item grouping | ||
| + | *B: Count of each general type. The white number counts usable items, the red number (if any) counts items that cannot be used, including those which belong to others (such as a caravan) and those which have been forbidden. A “?” at the end of a value means you haven't had your bookkeeper maintain records precise enough to know the exact value yet. | ||
| + | *C: individual kinds of items. Items of the same kind but different [[quality]] are grouped together unless {{K|Tab}} is pressed. | ||
| + | *{{K|tab}}: Mode - Changes between listing single items, and grouping items of different quality but same type together. | ||
| + | *{{K|z}}: Zoom - only available after pressing {{K|tab}}, zooms screen to selected item. | ||
| + | *{{K|v}}: View - only available after pressing {{K|tab}}, views information on selected item. | ||
| + | *{{K|m}}: Melt - Marks/unmarks item or group to be melted | ||
| + | *{{K|f}}: Forbid - Marks/unmarks item or group to be forbiden | ||
| + | *{{K|d}}: Dump - Marks/unmarks item or group to be dumped | ||
| + | *{{K|h}}: Hide - Marks/unmarks item or group to be hidden | ||
| + | {{-}} | ||
| + | |||
| + | ==== Health Screen ==== | ||
| + | [[Image:HealthScreen2010.png|right|480px]] | ||
| + | :''Main article: [[Health screen]]'' | ||
| + | |||
| + | :Lists all types of [[Healthcare]] information about tamed animals and dwarves in your fortress. Only visible if you have appointed a [[Chief medical dwarf]]. | ||
| + | {{-}} | ||
| + | |||
| + | ==== Justice Screen ==== | ||
| + | [[Image:JusticeScreen2010.png|right|480px]] | ||
| + | :Lists information about Justice at your fortress. | ||
| + | |||
| + | * A - Any criminals currently wanted or being punished are listed here | ||
| + | * B - Shows details about the currently selected criminal - crimes committed, punishment sentenced, and the officer currently assigned to carry out punishments. | ||
| + | * C - This lists the number of cages and chains marked for jailing criminals. | ||
| + | {{-}} | ||
| + | |||
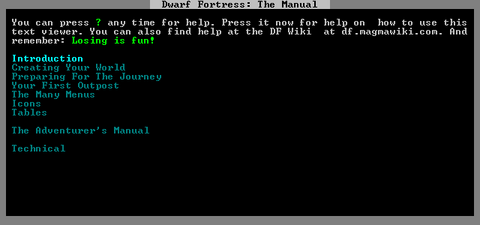
=== Help Screen === | === Help Screen === | ||
| + | [[Image:HelpScreen2010.png|right|480px]] | ||
| + | {{-}} | ||
| + | {{Category|Interface}} | ||
Latest revision as of 05:07, 17 February 2012
| This article is about an older version of DF. |
| This article is a stub. You can improve the article by expanding it. |
The purpose of this page is to help players look up the meaning of user interface elements. See Gameplay User Interface for more general information about the UI.
Main in-game Menu[edit]
- a: View Announcements - Displays recent Announcements
- b: Building - Building Menu
- r: Reports - Combat reports screen
- c: View civilizations - Shows Civilizations that have been met
- d: Designations - Designate Menu
- o: Set Order - Orders Menu
- k: Look Around
- j: Job List - Jobs Screen
- m: Military - Military Interface
- s: Squads - Squads Menu
- N: Points/Routes/Notes - Notes Menu
- w: Define Burrows - Burrows Menu
- p: Stockpiles - Stockpiles Menu
- i: Zones - Place a Zone
- q: Set Building Tasks/Prefs -
- R: View Rooms/Buildings - View Rooms and Building List
- t: View Items in Buildings
- v: View Units
- h: Hot Keys - Hot Keys Menu
- n: Nobles and Administrators - Nobles Screen
- z: Status - Status Screen
- Tab: Move this menu/map - Moves the menu/map into another arrangement
- ?: Help - Help Screen
- Esc: Options - Set Options
- ;: Movies
- D: Depot Access - View whether your Trade depots can be reached by other civs
- Space: Resume
- .: One-Step
- u: Units Screen - Not displayed on Menu.
Building Menu[edit]

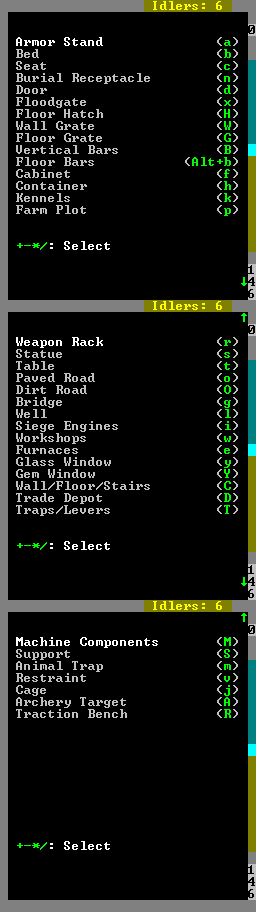
- This menu lists objects/buildings that can be placed. Some require dwarves to have a specific hauling labor set, others require dwarves to have another labor set.
- Armor Stand (a) - Place a built Armor stand (req. Furniture hauling)
- Bed (b) - Place a built Bed (req. Furniture hauling)
- Seat (c) - Place a built Throne (req. Furniture hauling)
- Burial Receptacle (n) - Place a built Coffin (req. Furniture hauling)
- Door (d) - Place a built Door (req. Furniture hauling)
- Floodgate (x) - Place a built Floodgate (req. Furniture hauling)
- Floor Hatch (H) - Place a built Floor hatch (req. Furniture hauling)
- Wall Grate (W) - Place a built Wall grate (req. Furniture hauling)
- Floor Grate (G) - Place a built Floor grate (req. Furniture hauling)
- Vertical Bars (B) - Place Vertical bars (req. Furniture hauling)
- Floor Bars (Alt+(b) - Place Floor bars (req. Furniture hauling)
- Cabinet (f) - Place a built Cabinet (req. Furniture hauling)
- Container (h) - Place a built Container (req. Furniture hauling)
- Kennels (k) - Construct a Kennel (req. animal training, small animal dissection and/or trapping labor)
- Farm Plot (p) - Place a Farm (req. Farming (fields) labor)
- Weapon Rack (r) - Place a built Weapon rack (req. Furniture hauling)
- Statue (s) - Place a built Statue (req. Furniture hauling)
- Table (t) - Place a built Table (req. Furniture hauling)
- Paved Road (o) - Build a Paved road (req. Architecture labor)
- Dirt Road (O) - Build a Dirt road (req. Architecture labor)
- Bridge (g) - Build a Bridge (req. Architecture labor)
- Well (l) - Build a Well (req. Architecture labor)
- Siege Engines (i)
- Ballista (b)
- Catapult (c)
- Workshops (w) - Workshops Menu - Menu to build various Workshops
- Furnaces (e) - Furnaces Menu - Menu to build various Furnaces
- Glass Window (y) - Place a built Glass window (req. Furniture hauling)
- Gem Window (Y) - Create a Gem window (with job)
- Wall/Floor/Stairs (C)
- Wall (w) - Build a Wall (req. Masonry/Carpenter labor)
- Floor (f) - Build a Floor (req. Masonry/Carpenter labor)
- Ramp (r) - Build a Ramp (req. Masonry/Carpenter labor)
- Up Stair (u) - Build a Up stair (req. Masonry/Carpenter labor)
- Down Stair (d) - Build a Down stair (req. Masonry/Carpenter labor)
- Up/Down Stair (x) - Build a Up/Down Stair (req. Masonry/Carpenter labor)
- Fortification (F) - Build a Fortification (req. Masonry/Carpenter labor)
- Trade Depot (D) - Construct a Trade depot
- Traps/Levers (T)
- Stone-Fall Trap (s) - Build a Stone-fall trap (req. Mechanics labor)
- Weapon Trap (w) - Build a Weapon trap (req. Mechanics labor)
- Lever (l) - Build a Lever (req. Mechanics labor)
- Pressure Plate (p) - Build a Pressure plate (req. Mechanics labor)
- Cage Trap (c) - Build a Cage trap (req. Mechanics labor)
- Upright Spear/Spike (S) - Build a Upright Spear/Spike (req. Mechanics labor)
- Machine Components (M)
- Screw Pump (s) - Build a Screw pump (req. Mechanics labor)
- Water Wheel (w) - Build a Water wheel (req. Mechanics labor)
- Windmill (m) - Build a Windmill (req. Mechanics labor)
- Gear Assembly (g) - Build a Gear assembly (req. Mechanics labor)
- Horizontal Axle (h) - Build a Horizontal axle (req. Mechanics labor)
- Vertical Axle (v) - Build a Vertical axle (req. Mechanics labor)
- Support (S) - Construct a Support (req. Architecture labor)
- Animal Trap (m) - Place an Animal trap (with hauling)
- Restraint (v) - Place a Restraint (req. Furniture hauling)
- Cage (j) - Place a built Cage (req. Furniture hauling)
- Archery Target (A) - Build an Archery target (req. Architecture labor)
- Traction Bench (R) - Place a Traction bench (req. Furniture hauling)
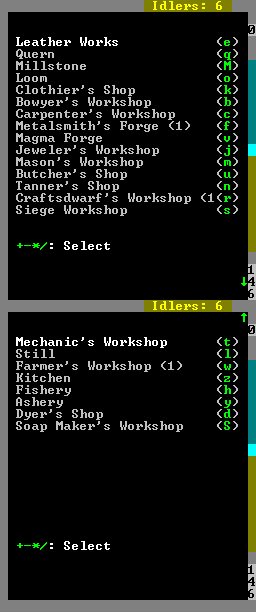
Workshops Menu[edit]

- Leather works (e) - Build a Leather works (req. Leatherworking labor)
- Quern (q) - Build a Quern (req. Milling labor)
- Millstone (M) - Build a Millstone (req. Mechanics labor)
- Loom (o) - Build a Loom (req. Weaving labor)
- Clothier's Shop (k) - Build a Clothier's shop (req. Clothesmaking labor)
- Bowyer's Workshop (b) - Build a Bowyer's workshop (req. Crossbow-making labor)
- Carpenter's Workshop (c) - Build a Carpenter's workshop (req. Carpentry labor)
- Metalsmith's Forge (f) - Build a Metalsmith's forge (req. Weaponsmithing/Armoring/Blacksmithing/Metalcrafting labor)
- Magma Forge (v) - Build a Magma forge (req. Weaponsmithing/Armoring/Blacksmithing/Metalcrafting labor)
- Jeweler's Workshop (j) - Build a Jeweler's workshop (req. Gem cutting or Gem setting labor)
- Mason's Workshop (m) - Build a Mason's workshop (req. Masonry labor)
- Butcher's Shop (u) - Build a Butcher's shop (req. Butchery labor)
- Tanner's Shop (n) - Build a Tanner's shop (req. Tanning labor)
- Craftsdwarf's Workshop (r) - Build a Craftsdwarf's workshop (req. Woodcrafting/Bone carving/Stonecrafting labor)
- Siege Workshop (s) - Build a Siege workshop (req. Siege engineering labor)
- Mechanic's Workshop (t) - Build a Mechanic's workshop (req. Mechanics labor)
- Still (l) - Build a Still (req. Brewing labor)
- Farmer's Workshop (w) - Build a Farmer's workshop (req. Plant processing/Milking/Cheese making labor)
- Kitchen (z) - Build a Kitchen (req. Cooking labor)
- Fishery (h) - Build a Fishery (req. Fishing/Fish cleaning labor)
- Ashery (y) - Build an Ashery (req. Potash making or Lye making labor)
- Dyer's Shop (d) - Build a Dyer's shop (req. Dyeing labor)
- Soap Maker's Workshop (S) - Build a Soap maker's workshop (req. Soap making labor)
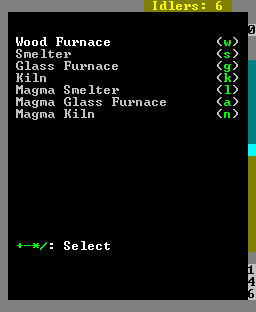
Furnaces Menu[edit]

- Wood Furnce (w) - Build a Wood furnace (req. Architecture labor)
- Smelter (s) - Build a Smelter (req. Architecture and Masonry labor)
- Glass Furnace (g) - Build a Glass furnace (req. Architecture and Masonry/Metalsmithing labor)
- Kiln (k) - Build a Kiln (req. Architecture and Masonry labor)
- Magma Smelter (l) - Build a Magma smelter (req. Architecture and Masonry labor)
- Magma Glass Furnace (a) - Build a Magma glass furnace (req. Architecture and Masonry/Metalsmithing labor)
- Magma Kiln (n) - Build a Magma kiln (req. Architecture and Masonry labor)
Combat reports Screen[edit]
Hit r to enter the report screen then go through the listing until you find the desired victim.
Designations Menu[edit]

The Designations Menu (accessed by d provides the means to mark tiles with various designations including Mining, Wood Cutting, Plant Gathering, Stone Detailing as well as removing constructions, controlling traffic and other miscellaneous designations.
Jobs Screen[edit]

Squads Menu[edit]

- This menu allows you to manage your squads
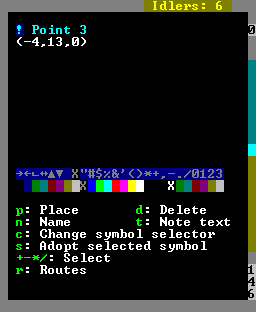
Notes Menu[edit]

- Allows the placement of notes, also referred to as “points”. Required to create patrol routes, often used to label levers so you can remember what they are connected to.
- p: Place - Places a note on the cursor
- d: Delete - Deletes notes on the cursor
- n: Name - Name/label the note placed at this point
- t: Note text - Add additional information for the note
- c: Change symbol selector - Change which part of the symbol is being modified with +- */, forecolor, backcolor, or symbol.
- s: Adopt selected symbol - Makes all future notes use the selected options .
- +- */ - Modify currently selected (using c) part of the symbol
- r:Routes – #Routes Menu allows linking of Notes/points together to form routes for patrols.
Routes Menu[edit]

- a: Add route - Create a new route.
- e: Edit waypts - Edit points that make up the route.
- a: Add waypt - Add current point to route.
- d: Add waypt - Delete current point from route.
- p: Add waypt - Finish editing route.
- d: Del route - Delete currently selected route.
- n: Name route - Name current route
- c: Center - Center on route.
- +- */ - Select different routes
- p: Back to points/notes - Return to Notes menu
Burrows Menu[edit]

- This menu allows the creation and use of Burrows, which help to organize where dwarves are allowed to move/work
- a: Add new burrow - Create a new burrow
- d: Delete - Delete currently selected burrow
- +- */: Change selection - Switch burrows
- Enter: Define this burrow - Select areas that make up burrow, multiple areas can be created.
- c: Change symbol selector - Change which part of the symbol is being modified with +- */, forecolor, backcolor, or symbol.
- +- */ - Modify currently selected (using c) part of the symbol
- c: Add citizens to burrow - Allows you to select which citizens are restricted to this burrow.
- z: Center on burrow
- Esc: Done
Stockpiles Menu[edit]

- Creates stockpiles, dwarves will place items in the appropriate stockpile if they have the correct hauling labor.
- a: Animal - Stores animals in cages/traps, empty cages/traps
- f: Food - Stores food and food by-products (Meat/Fish/Plants/Drinks/Cheese/Seeds/Leaves/Milled plants/Fat/Blood/Lye/ect.)
- u: Furniture Storage - Stores furniture and siege ammo
- y: Graveyard - Stores dead dwarves
- r: Refuse - Stores garbage/dead animals/bones/skulls/shells
- s: Stone - Stores stone/ore
- w: Wood - Stores wood
- e: Gem - Stores rough/cut gems
- b: Bar/Block - Stores bars (Metal/Coal/Potash/Ash/Pearlash/Soap), and Blocks (Stone/Glass)
- h: Cloth - Stores cloth/thread
- l: Leather - Stores leather
- z: Ammo - Stores Bolts/Arrows/Blowdarts
- n: Coins - Stores coins
- g: Finished Goods - Stores finished goods (chains/crafts/clothing (not armor)/splints/crutches/more)
- p: Weapons - Stores weapons/trap components
- d: Armor - Stores armor
- c: Customer Stockpile - Build custom stockpile (define with t)
- t: Custom Settings - Define custom stockpile
- / *: Reserved Barrels - Set the number of barrels that will be reserved for workshop use (such as the Still).
- -:+: Reserved Bins - Set the number of bins that will be reserved for workshop use.
- x: Remove Designation - Remove stockpiles
- Enter: Select - Place start/end corner of stockpile.
Hot Keys Menu[edit]

- Allows the editing of hotkeys. Pressing a hotkey, F1-F8 or Shift F1-F8 zooms to that location.
- F#: Select line F#
- Shift+F#: Select line Shift+F#
- n: Change Name - Name this hotkey
- z: Zoom Here - Set screen to zoom the the current location when selected hotkey is pressed.
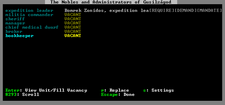
Nobles Screen[edit]

- In this screen various nobles can be assigned/removed. See the nobles article for details on nobles, their requirements/demands/mandates.
- Enter: View Unit/Fill Vacancy - Assigns a unit to the position if it's empty, otherwise opens the View screen for that unit.
- r: Replace - Replace the current position if possible, or place if empty.
- s: Settings - Only available for the broker
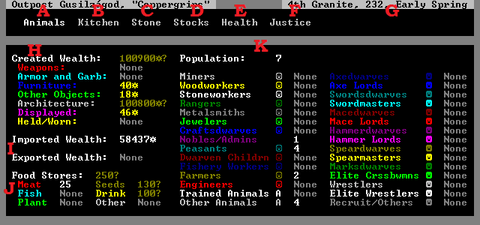
Status Screen[edit]

- Shows basic Fortress status.
- A - Animals
- B - Kitchen
- C - Stone
- D - Stocks
- E - Health
- F - Justice
- G - Date - Day Month, Year, Early/Middle/Late Season - Trade caravans arrive late in the month. Elves/Humans/Dwarves : Spring/Summer/Autumn
- H: Summary of your wealth, requires Broker with Appraisal skill to see - More wealth often leads to larger groups of immigrants, and sieges. The wealth of unground structures you can't see is listed here. “?” at the end of a value means you haven't had your bookkeep keep records precise enough to know the exact value yet.
- I: How much wealth you have acquired through trade, or traded away (Import/Export)
- J: How much food you have. Other contains prepared meals, as well as some inedible plants.
- ←→ - Move sub-menu
- Enter - Select sub-menu
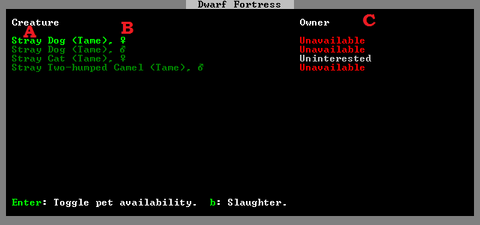
Animals Screen[edit]

- This shows information about all tame animals at your fortress.
- A: Animal type. Stray Animals can be toggled to become pets, Tame animals are not hostile to your dwarves.
- B: Gender: Amulet is Female, Bag (circle with arrow) is male.
- C: Who owns the animal. Animals marked unavailable can't be adopted. Animals marked “Ready for Slaughter will be slaughtered by a butcher at a butcher's shop. Cats are marked as Uninterested and can't be set as available, cats will adopt dwarves themselves.
- ↓↑ - Move between animals
- Enter - Toggle pet availability (not possible on untamed or cats)
- b - Slaughter
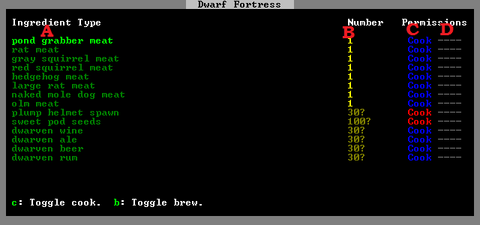
Kitchen Screen[edit]

- This screen allows you to control what food is processed in which manner.
- A: Type of food
- B: Count for that food. “?” at the end of a value means you haven't had your bookkeep keep records precise enough to know the exact value yet.
- C: Whether a food is available to be cooked if possible. Blue=Yes/Red=No
- D: Whether a food is available to be brewed if possible. Blue=Yes/Red=No
- ↓↑ - Move between food items
- c - Toggle cook.
- b - Toggle brew.
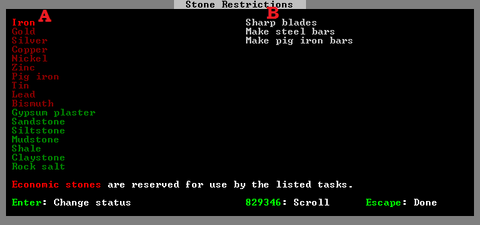
Stone Screen[edit]

- This screen lets you restrict usage of stone to specific tasks. All possible stones are listed here.
- A: Type of Stone/ore/bar.
- B: Various reactions that this item is a part of (these can be selected for more information)
- Enter - Mark stone economic/non-economic
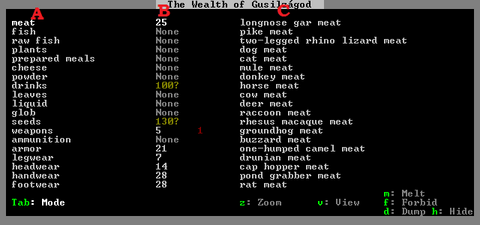
Stocks Screen[edit]

- This screen lists every item in your fortress.
- A: General item grouping
- B: Count of each general type. The white number counts usable items, the red number (if any) counts items that cannot be used, including those which belong to others (such as a caravan) and those which have been forbidden. A “?” at the end of a value means you haven't had your bookkeeper maintain records precise enough to know the exact value yet.
- C: individual kinds of items. Items of the same kind but different quality are grouped together unless Tab is pressed.
- tab: Mode - Changes between listing single items, and grouping items of different quality but same type together.
- z: Zoom - only available after pressing tab, zooms screen to selected item.
- v: View - only available after pressing tab, views information on selected item.
- m: Melt - Marks/unmarks item or group to be melted
- f: Forbid - Marks/unmarks item or group to be forbiden
- d: Dump - Marks/unmarks item or group to be dumped
- h: Hide - Marks/unmarks item or group to be hidden
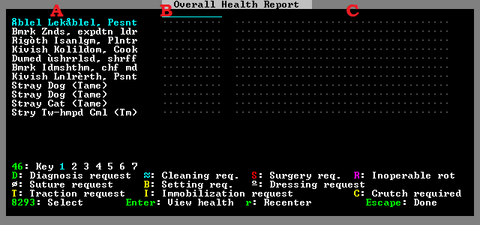
Health Screen[edit]

- Main article: Health screen
- Lists all types of Healthcare information about tamed animals and dwarves in your fortress. Only visible if you have appointed a Chief medical dwarf.
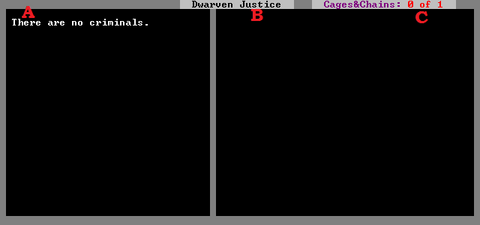
Justice Screen[edit]

- Lists information about Justice at your fortress.
- A - Any criminals currently wanted or being punished are listed here
- B - Shows details about the currently selected criminal - crimes committed, punishment sentenced, and the officer currently assigned to carry out punishments.
- C - This lists the number of cages and chains marked for jailing criminals.
Help Screen[edit]
