- v50 information can now be added to pages in the main namespace. v0.47 information can still be found in the DF2014 namespace. See here for more details on the new versioning policy.
- Use this page to report any issues related to the migration.
Moat
| This article was migrated from DF2014:Moat and may be inaccurate for the current version of DF (v53.12). See this page for more information. |
| Part of a number of articles on |
| Projects |
|---|
| Basic |
| Aqueduct • Archery tower • Atom smasher • Danger room • Dam • Garbage dump • Mass pit • Moat • Pit trap • Reservoir• Sally port • Swimming pool • Tower • Tree farm |
| Advanced |
| Drowning chamber • Magma piston • Obsidian farm • Pump stack • Silk farm • Water reactor |
v53.12 · v0.47.05 This article is about the current version of DF.Note that some content may still need to be updated. |
A moat is a simple and universally applicable piece of defense design, and often the first defense-oriented piece of engineering that players will embark upon. A basic moat is nothing more than a dug-out trench encircling your entrance with a single three-tile wide (for caravans) bridge over it attached to a lever. In the event of an attack, the lever can be pulled and the bridge raised, forcing enemies to get creative.
Creating a moat[edit]
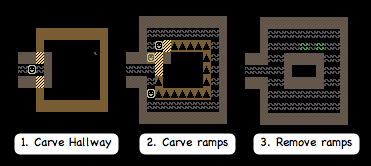
There are two ways to construct a moat. The first is to dig out the moat level and then channel down to it from the above. The second is to channel down to that level first and then remove all ramps. In both cases, it is necessary to have either a ramp leading out of the moat or a sealed-off access tunnel, to avoid stranding your miners. If you absolutely must have an absolutely clean moat, the effect can be achieved by building a support, attaching a floor to it above the ramp in question, linking it to a lever, and then collapsing the support. The floor will fall down and obliterate the ramp. Consider the following diagram which demonstrates the construction of a moat:
Example Design of Moat on Border[edit]
This design allows you to plan and schedule the construction of your moat and does not require close supervision. The design dimensions are in accordance with best practices as taught at DIT (Dwarven Institute of Technology).
Water Hazards[edit]
- Water hazards need to be removed by draining through a pressure reduction to a cistern where a pump can deliver fresh water to wells.
- Once drained, construct dam walls to prevent the water from flowing into the moat.
Surface[edit]
- Place wood stockpile from eleven (11) to fifteen (15) from the border.
- Schedule clearing a distance of ten (10) from the border by cutting all trees, smoothing all boulders, and perhaps gathering all plants.
- Construct a paved road five (5) wide on the border except where bridges will be located you should build stone floors.
- Schedule digging a channel three wide next to the paved roadway with a priority of five (5). Digging the channel at bridge crossings now will allow you to build your bridges early and have them ready to link to levers.
- Build a wall on the inside edge of the moat.
Level One Down[edit]
- Continue digging the channel three wide with a priority of seven (7).
- Schedule digging a channel one wide on each side with a priority of six (6).
- Mark this level as a blueprint until the surface channel is in progress and free of trees. 🎄
Level Two Down[edit]
- Schedule digging a hallway under the priority six (6) channels with a priority of four (4).
- Underneath the bridge crossing, ramp down to this level so that the miners can complete the hallways before digging the channels.
- You will need to provide safe access to this level to allow miners and workers to exit the moat and collect loot later in the game.
Finishing the Moat[edit]
- Once the bottom of the moat is complete, remove any ramps replacing them with floors.
- If the bottom of the moat is completely flat, either build a paved road on the bottom or smooth the surface to prevent plants and trees from growing.
Caveat[edit]
After clearing but before digging, new trees can sprout, care must be observed to avoid surface cave-ins when cutting these trees or you may have a fight break out between the frightened miners and the careless woodcutters.
Drawing[edit]
   L2         ┐_
   L1         ▓_
   L0 _____ĎĎĎ▓______
   L-1▐███     ██████
   L-2▐███     ██████
   L-2▐██████████████
Defense considerations[edit]
Climb-proofing your moat[edit]
These days, a goblin can just climb down a trench and climb right back out the other side. Here are a few strategies to prevent climbing out of the trench:
- 7/7 water at the bottom of the moat will drown many guests, and deter others.
- Magma is always appropriate.
- Cage, weapon, or repeating spike traps make it less likely that your enemies will survive crossing the trench.
- Block walls are difficult to climb, and smoothed natural walls are impossible to climb.
- An overhang or "lip" on the moat will prevent trapped enemies from climbing out of the moat on that side. The lip must protrude 2 tiles if made from walls, but only 1 tile if made from floors.
- Make sure your moat is of sufficient width that it can't be jumped over. Invaders aren't yet smart enough to do a running jump, but they can jump across a 1-tile gap (2 tiles for undead).
Trees[edit]
The greatest threat to the effectiveness of a moat is the common tree. Two trees on opposite sides of a moat are as good as a bridge if their branches come within a tile of each other; and a tree growing at the bottom of a moat makes a mockery of fortress defense.
Trees at the bottom of the moat can be prevented by digging down far enough that there is no soil at the bottom of the trench, which has the side benefits of making an invader's slip into the moat more deadly and increasing the distance necessary to climb back out afterward. Alternatively, pavement, constructions, and/or 7/7 water or magma will also prevent tree growth.
There are two primary ways of preventing poorly-timed tree growth from compromising your moat: you can either pave a 4-tile-wide collar around the outside of the moat; or you can dig a moat so wide that trees on either side will be unable to reach each other. You can also take advantage of the fact that a tree will not grow if the z-level below them has been dug out.
Lethality Improvements[edit]
As one can guess, a moat can be filled with water to drown sentients, but filling it with magma is obviously far more dwarven. Although a dry moat is perfectly functional, doing so will render it more lethal to enemies that slip in by accident, especially if something waits for them down below. This is a double-edged sword, however; you should make sure there are no dwarves standing on bridges when you pull levers, and have your military engage the enemy far from your moat.
Another option is to have the moat empty, and use a floodgate controlled by a lever to fill the moat with water or magma during a siege. Make a path through the moat for goblins to walk through, then flood it and drown them. You can also add another floodgate and lever to drain the moat when the siege is over.
A moat can also be filled with dangerous animals, such as dogs, bears, alligators or the ever-dreaded carp. This is most effective for dry or water-filled moats (since the animals will not kill the hapless dwarf that falls inside by accident, although he may just die of thirst inside it), but no one is stopping you from filling your magma moat with magma crabs.
Drawbacks[edit]
Morale[edit]
It's not that a moat is bad for morale, exactly; it's just that terrified dwarves tend not to look where they're fleeing. If a dwarf gets scared, it's just as likely to flee into the moat as it is into the fortress. Whether this is merely irritating or downright Fun will depend on how deadly the bottom of your moat is, and how easy it is to retrieve creatures stuck in it.
Amphibious/Fireimmune Enemies[edit]
It should be noted that water-filled moats can be easily crossed by natural swimmers such as amphibians and/or non-breathing creatures; this is ground for a hilarious bugBug:926 causing giant toads to drown the elite goblins riding them as they path through your defences during a siege. Likewise, magma-filled moats will be ineffective against fire-immune creatures who don't need to breathe, although only dragons and the various inhabitants of magma are actually immune to magma's heat, and dragons may just drown inside a magma moat.
Winter[edit]
Also note that, if you fill the moat with water in a climate that freezes during winter, the moat will become ineffective while the water in it has turned into ice. A deep moat filled only partway up with water will remain reasonably effective even during a freeze. Not to mention that, if your dwarves are standing on the ice as winter ends, it may result in them falling in and potentially drowning.
Ranged Enemies[edit]
A moat offers little protection against ranged enemies, and sending melee dwarves out across a bridge under enemy fire is foolhardy at best. You can surround the inside lip of your moat with fortifications and engage them in ranged combat, but elite ranged enemies will still be able to hit your marksdwarves through these defenses.
Flying Enemies[edit]
A moat offers no challenge to flying enemies, and should not be relied upon as a defense against them.

