- v50 information can now be added to pages in the main namespace. v0.47 information can still be found in the DF2014 namespace. See here for more details on the new versioning policy.
- Use this page to report any issues related to the migration.
40d:Tim's castle building tutorial
| This article is about an older version of DF. |
This is an intermediate-to-advanced tutorial on the building of castles, that is to say the front entrance. It is assumed that you are familiar with the game, it's interface, and how to do things such as properly build walls, designate stockpiles, dig channels etc. You should also be at least vaguely familiar with dwarven behaviour.
The art of castle building[edit]
A great dwarven general said: "The art of castle building is of vital importance to your dwarves. It is a matter of life and death. Hence it is a subject of inquiry which can on no account be neglected."
When building your fortifications, you must consider not only the behaviours of goblin invaders, but also the behaviours of your own dwarves in order to keep them safe from their own simple minds. You must also consider means of keeping any and all invaders out, no matter their number or type (mandrill, goblin, troll, or bronze colossus).
On your entrance[edit]
In order to keep your dwarves moving smoothly in and out of your fortress, you should have a wide entrance. However, in order to keep your dwarves safe from harmful visitors, your wide entrance must be able to be quickly removed.
Also, in order to ensure that any invaders will ultimately leave (allowing dwarves to safely go outside again), once your main entrance has been removed, there should be an alternative entrance ready for goblins and the like.
Such is the art of entrance design.
On your walls[edit]
Fighting from elevated terrain is advantageous, particularly for Marksdwarves. While fortifications can block shots that are fired from a distance, a good marksman can still fire through fortifications that are on the same level, or even one level above. Hence Marksdwarves should patrol an area well above the surrounding terrain.
To this effect, all areas of the outside of your fortress should be higher than their immediate surroundings so that no enemy can gain a height advantage over your dwarves.
Such is the art of wall design.
On your civilian population[edit]
Dwarves are not too bright. They will happlessly wander about and only react to danger at the last moment, often when it is too late. To ensure that all dwarves are kept safe, only soldiers should be allowed outside in the event of a siege. As dwarves will also go outside before they realise that where they are going is forbidden, all main entrances should be some distance outside to give them a chance to realise their folly before they run into any serious danger.
Such is the art of keeping civilians safe.
Practical examples[edit]
The above principles are the basis of the following examples. Please note that these are only examples. So long as you address all the issues, you can make your entrance in any number of different ways.
Ground Level[edit]
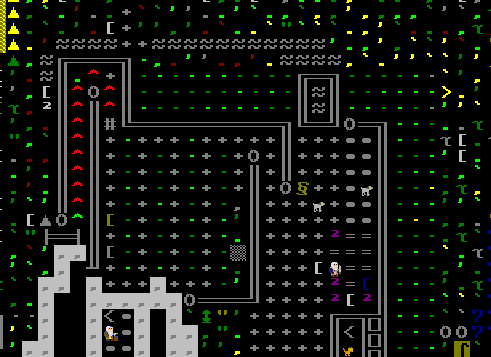
The above image shows the ground floor of the fortress's entrance.
Main Entrance[edit]
To the top right of the picture is the main bridge entrance. Important things to note include:
- The bridge is three tiles wide. This is the minimum width for a main bottleneck.
- The bridge retracts via a lever that is inside. This enables dwarves to operate the lever even if they are not allowed to go outside. A raised bridge also provides a wall to protect anyone on the inside from hostile ranged weapons.
- The chained dogs detect thieves and ambushers that may have made it past any detectors or traps outside
- The stockpile of stone is for building the road outside. Stockpiles are useful during the building process if kept at the base of the stairway going up.
The reason that the entrance is outside, rather than the more comfortable subterranean, is so that any civilian dwarves thinking that it would be a good idea to clean a trap, or store an item in a stockpile, get a chance to realise that what they are trying to do is in a forbidden area (i.e. outside with all the goblins!) before actually meeting up with an untimely death.
Secondary (Goblin) Entrance[edit]
The entrance to the left is specifically designed for invaders. Its features include:
- The bridge on the left wall is so that this entrance can be retracted if so desired. My previous design included floor grates (one is still there) connected to levers. These were destroyed by vandalous trolls, so the bridge, being significantly more sturdy, was used to replace them.
- There is a long winding corridor, external to the rest of the castle, which is full of traps. Weapon traps are most effective at removing goblins and trolls, but will ultimately jam under heavy use. Cage traps are essentially an instant kill for any unwelcome guest. Only one cage is used so that it can capture a large/powerful invader (one fortress of mine had a caged bronze colossus from this method), with the rest being weapon traps to kill numerous weak invaders such as goblins.
- The cage trap also means that goblin squad leaders (other than the first one) will make it some distance inside before they die and leave their squad running in disarray. Hopefully the marksdwarves on the battlements (see later in this article) will have had plenty of time to dish out the pain before that squad gets a chance to get out of range again.
- The ramp going to the top of the wall allows the removal of goblin chunks, which are occasionally flung up by the weapon traps.
- On the inner side of the secondary entrance is a long windy path for invaders that might make it past the traps. This path maximises the time invaders spend walking into the fortress while under fire from the patrolling marksdwarves above.
- The end of the winding path is blocked by a wall. This protects waiting melee dwarves from any ranged attackers that may have made it past the traps.
You can make the trapped area as long as you like, but having it turn back on itself is the most space efficient way to extend it.
Moat[edit]
The moat around the castle keeps invaders out away from the base of the walls. If you ever get the chance to check out your fortress in adventure mode, you will notice the vision arcs that extend out around objects such as walls and trees. These vision cones also extend from one z-level to another. This means that a dwarf behind a fortification on the top of a wall will not be able to see anything at the base of the wall they are on. Their vision is blocked as far out as the wall is high, so a wall three levels high can't see anything in the first three tiles from the castle walls at ground level.
The Stairway up[edit]
At the bottom of the picture, on the left and the right, you will see two upward staircases. The most important thing to note is that these are on the inside. When construction is underway, it is often easier to leave these sections open so that the stone of choice (I like my walls made in a uniform colour) can be stockpiled at the bottom, but if this is not quickly sealed off again, it can leave your marksdwarves vulnerable to melee attack if ambushers can get close enough before the bridge is raised.
Marksdwarves Patrol Route[edit]
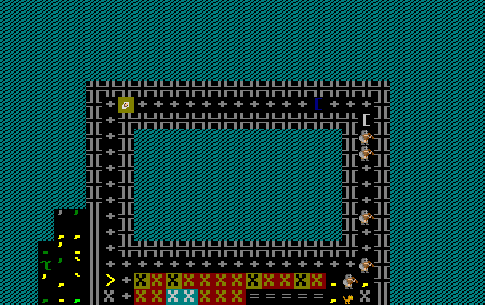
Three z-levels above the previous image is the patrol route for marksdwarves. This elevated position gives them a massive advantage over incoming enemies, and full sight of the surrounding area. The dwarves patrol in a circular motion, kind of like a radar sweep, so that they should see anything that is coming in, no matter where they come from.
Interesting points to note include:
- There are ammo bins full of metal bolts available near by to minimise dwarves going outside the fortress to pick up ammo
- The fortifications are not broken up by walls, even though the level above has a floor (to stop patrolling dwarves being nauseated by the sun). The reason for this is that the cone of blocked vision is quite significant (this is particularly noticable in adventure mode), and hampers target acquisition too much over the full distance of engagement.
- The ground on the left in this case is accessible only from within the fortress. This is the only time that terrain outside the fortiications should be at the same level or higher than the dwarves.
- No, the new-born baby is not drafted into the military and on patrol. That would just be poor HR management - the new mother is patrolling while breastfeeding...
Effective Range[edit]
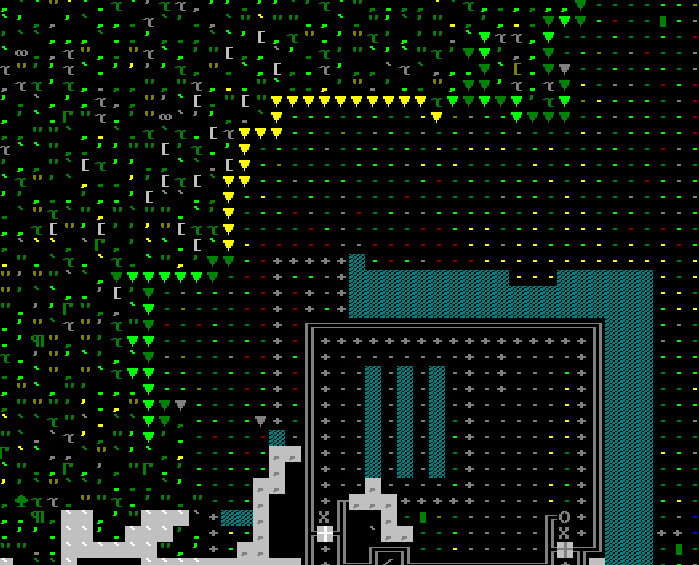
This image is one level above the ground level, and shows the effective range of dwarves patrolling at the top of the castle. The piles of goblin clothing shows how far some goblins make it before being shot down. Keep in mind that the actual range of engagement is a little further than this, as most goblins can take a few extra steps after being hit before being taken down. Of course, the better the marksdwarf, the more likely they are to make a kill shot at full range.
You should also notice that the entrance to the fortress is kept fairly clear of trees. This is so that incoming hostiles don't get to hide behind any cover.
This image also shows the method of building multi-level wall building. Each level of wall above the ground has a floor built beside it, and this floor is used to build the wall on that level, which provides a floor on the level above, to build a floor beside and so on. If you want something to do with your excess stone, you can build a 4x4 (or 10x10 if you really like) tower as high as you like this way.


