v50 Steam/Premium information for editors
- v50 information can now be added to pages in the main namespace. v0.47 information can still be found in the DF2014 namespace. See here for more details on the new versioning policy.
- Use this page to report any issues related to the migration.
This notice may be cached—the current version can be found here.
Difference between revisions of "v0.31:Security design"
Jump to navigation
Jump to search
(Created page with '{{av}} {{elven}} :''This page is one of several inter-related articles on the broader topic of defending your fortress and your dwarves. '''Security design''' focuses on how to …') |
(this still needs tons of work; don't worry, I know, just preparing some redirects) |
||
| Line 3: | Line 3: | ||
:''This page is one of several inter-related articles on the broader topic of defending your fortress and your dwarves. '''Security design''' focuses on how to turn the physical layout and architecture of a fort into a defensible whole. For a general overview of the threats that will challenge your fortress and things to consider when preparing a standard defence, see the '''{{l|defense guide}}'''. For complex traps that are not a minor/optional part of a larger defensive plan (but might be adapted or plugged into one), see '''{{l|trap design}}'''. For specific advice on how to get your soldiers prepared for any threat, see '''{{l|military design}}'''. | :''This page is one of several inter-related articles on the broader topic of defending your fortress and your dwarves. '''Security design''' focuses on how to turn the physical layout and architecture of a fort into a defensible whole. For a general overview of the threats that will challenge your fortress and things to consider when preparing a standard defence, see the '''{{l|defense guide}}'''. For complex traps that are not a minor/optional part of a larger defensive plan (but might be adapted or plugged into one), see '''{{l|trap design}}'''. For specific advice on how to get your soldiers prepared for any threat, see '''{{l|military design}}'''. | ||
| + | |||
| + | There are hundreds of viable ways to defend a fortress, but many successful strategies rely on a few key principles. Some suggested principles are listed below. More complicated specific strategies can be found at [[trap design]]. | ||
| + | |||
| + | *Keep your [[depot]] inside or walled off. The trade depot is a hub of activity and its use by merchants often corresponds to invasions. Enemy archers can fire at your dwarves from quite a distance, and it is good to limit the number of directions a depot can be fired upon from. | ||
| + | *When first playing, limit the number of entrances to your fort. Fewer entrances means fewer locations to defend, especially against enemies that ignore locked doors like [[kobold]] thieves. | ||
| + | :*Ideally, your military barracks should be near entry points to your fort to lessen response time. As you breach [[caverns]], you may wish to set up new military supply points in the vicinity. | ||
| + | *Securing your resources is important. If woodcutters are being ambushed, consider walling off a section of forest to serve as a tree plantation. If fisherdwarves are being ambushed, either create an indoor fishing [[zone]] or secure the outdoor one. | ||
| + | *When developing more complicated devices such as drowning and burning traps, be sure and think about how the device will be deactivated. A drowning trap in your main entrance, for example, can wipe out an entire siege if deployed properly, but can also flood your fortress if drained improperly. | ||
| + | *Enemies can be herded by constructed features. If you have a particular zone covered by catapults and would like enemies to pass through it, strategically placed walls can make enemy pathfinding more favorable. | ||
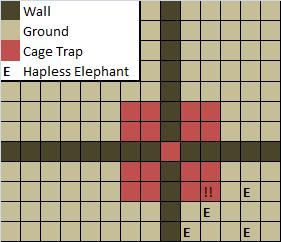
| + | :*Constructed walls can be used to great effect when attempting to use single-tile constructed [[traps]]. A trap occupying a single tile in the middle of a barren plain is likely to never get triggered. However, if walls are placed in a cross-hair pattern around the trap, animals and invaders are much more likely to pass over it as they wander across the map. This can be a very useful trick when capturing wildlife with cage traps. | ||
| + | :[[File:Dwarf Fortress Crosshair Trapping.jpg]] | ||
{{Military v0.31}} | {{Military v0.31}} | ||
Revision as of 23:25, 11 April 2010
| This article is about an older version of DF. |
- This page is one of several inter-related articles on the broader topic of defending your fortress and your dwarves. Security design focuses on how to turn the physical layout and architecture of a fort into a defensible whole. For a general overview of the threats that will challenge your fortress and things to consider when preparing a standard defence, see the Template:L. For complex traps that are not a minor/optional part of a larger defensive plan (but might be adapted or plugged into one), see Template:L. For specific advice on how to get your soldiers prepared for any threat, see Template:L.
There are hundreds of viable ways to defend a fortress, but many successful strategies rely on a few key principles. Some suggested principles are listed below. More complicated specific strategies can be found at trap design.
- Keep your depot inside or walled off. The trade depot is a hub of activity and its use by merchants often corresponds to invasions. Enemy archers can fire at your dwarves from quite a distance, and it is good to limit the number of directions a depot can be fired upon from.
- When first playing, limit the number of entrances to your fort. Fewer entrances means fewer locations to defend, especially against enemies that ignore locked doors like kobold thieves.
- Ideally, your military barracks should be near entry points to your fort to lessen response time. As you breach caverns, you may wish to set up new military supply points in the vicinity.
- Securing your resources is important. If woodcutters are being ambushed, consider walling off a section of forest to serve as a tree plantation. If fisherdwarves are being ambushed, either create an indoor fishing zone or secure the outdoor one.
- When developing more complicated devices such as drowning and burning traps, be sure and think about how the device will be deactivated. A drowning trap in your main entrance, for example, can wipe out an entire siege if deployed properly, but can also flood your fortress if drained improperly.
- Enemies can be herded by constructed features. If you have a particular zone covered by catapults and would like enemies to pass through it, strategically placed walls can make enemy pathfinding more favorable.
- Constructed walls can be used to great effect when attempting to use single-tile constructed traps. A trap occupying a single tile in the middle of a barren plain is likely to never get triggered. However, if walls are placed in a cross-hair pattern around the trap, animals and invaders are much more likely to pass over it as they wander across the map. This can be a very useful trick when capturing wildlife with cage traps.