- v50 information can now be added to pages in the main namespace. v0.47 information can still be found in the DF2014 namespace. See here for more details on the new versioning policy.
- Use this page to report any issues related to the migration.
Difference between revisions of "Quickstart guide"
m (→Embark: moved pressing Play now to previous section) |
(→Embark: added tutorial info to section intro) |
||
| Line 51: | Line 51: | ||
= Embark = | = Embark = | ||
| − | |||
{{main|Embark}} | {{main|Embark}} | ||
| + | Embarking is the process of choosing a site, outfitting your initial dwarves, and sending them on their way. If you choose to {{DFtext|Start tutorial|7:2:1}} the game will do it all for you, flashing the location of the site it chose, then skipping straight to your arrival there. It is the quickest way to start. | ||
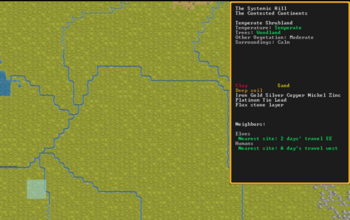
| − | + | If you choose {{DFtext|Skip tutorial|7:4:1}}, you'll get some good advice not to ignore any warnings about the site. You can then look around by pointing at locations to see details, zoom in with {{k|left click}}, and zoom out with {{k|right click}} (if any menu is open right click closes it instead.) However, the quickest way to find your own site is by clicking {{DFtext|Find embark location}} (available when the map is zoomed out). | |
| − | |||
| − | |||
== Choosing a Good Site == | == Choosing a Good Site == | ||
| − | + | {{migrated section}} | |
Choosing a good embark site is crucial for beginners. Highly skilled players can run a fortress on an evil glacier, but for now, stick to friendly environments. Look for features in an embark site that will make your first fort easier to manage. | Choosing a good embark site is crucial for beginners. Highly skilled players can run a fortress on an evil glacier, but for now, stick to friendly environments. Look for features in an embark site that will make your first fort easier to manage. | ||
Revision as of 11:17, 24 June 2023
v50.13 · v0.47.05 This article is about the current version of DF.Note that some content may still need to be updated. |
- For installation instructions, see Installation.
- This is a quickstart guide for dwarf fortress mode for those who have never played before and quickly want to jump in head-first. If you are looking to learn adventure mode instead, see the Adventure mode quick start guide.
- Also see Tutorials for more detailed tutorials that people have submitted.
Always remember that losing is fun! Be prepared to lose a few fortresses before you get all the way through this guide – it can be easy to accidentally kill the entire fortress while learning. But remember: losing means that next time, you'll remember how you lost. In a big way, Dwarf Fortress uses the principle of learning from one's mistakes.
So, you want to play Dwarf Fortress, but you have no idea what to do. That's understandable; in Dwarf Fortress you can really do anything you like. It is a huge, complex, and totally open-ended game. But in order to do anything, first you need a sustainable fortress. It turns out that this is not as hard as you might think.

Common UI Concepts
While the guide contains many links, you may still need to look something up. Refer to the Fortress Mode Reference Guide or use the wiki search function. Also, don't hesitate to ask for help if you can't find answers on the wiki.
This is just the Quickstart Guide, so we skip lots of details on the UI. If you're looking for more UI help as you get deeper into your first fortress, you may also want to read this section in the Fortress Mode Guide.
About key symbols
This wiki uses symbols that look like t or ![]() t to indicate what keys or interface buttons are used for an operation. Note that keys are case sensitive and to save space, Shift+t is shown as T. So t means "press the 't' key without the shift key" and T means "hold down shift and press the 't' key". Lowercase and uppercase keys will often perform different functions, so it is important to use the correct key. Sequences of keys will be in separate boxes, so abC means "press 'a', then press 'b', then hold shift and press 'c'"; while
t to indicate what keys or interface buttons are used for an operation. Note that keys are case sensitive and to save space, Shift+t is shown as T. So t means "press the 't' key without the shift key" and T means "hold down shift and press the 't' key". Lowercase and uppercase keys will often perform different functions, so it is important to use the correct key. Sequences of keys will be in separate boxes, so abC means "press 'a', then press 'b', then hold shift and press 'c'"; while ![]() b
b![]() T means "press 'b', then hold shift and press 'T'. A plus sign '+' between the boxes means to press them all together, so Shift+Enter means to hold shift and press 'Enter'. Other separators, such as ',' or '-', might be used but mean the same as no separator: to press the keys in sequence.
T means "press 'b', then hold shift and press 'T'. A plus sign '+' between the boxes means to press them all together, so Shift+Enter means to hold shift and press 'Enter'. Other separators, such as ',' or '-', might be used but mean the same as no separator: to press the keys in sequence.
Keybindings can be seen and changed on the Keybindings tab in the Settings menu.
| Esc or right mouse | Go back to the previous screen/menu |
| Mouse wheel | Scroll menu one line |
| Shift+mouse wheel | Scroll menu one page |
| Left mouse | Select menu option |
Esc or right mouse will almost always return to the previous screen until you get to the top level of the UI, at which point Esc will display the options menu.
Basic game-related tasks (saving, quitting, settings, etc.) are available on the options menu, which can be reached with ![]() Esc from the main screen. Esc again or right click will close the menu. This menu also shows the current or previous music track.
Esc from the main screen. Esc again or right click will close the menu. This menu also shows the current or previous music track.
For more information see Saving, Reclaim fortress mode, and Settings.
World Generation
First, create a new world. Dwarf Fortress worlds are always procedurally randomly generated - there is no "default" or "standard" world. Luckily, the basic version of this process is simple, and with these suggested settings won't take too long. Wait until the game shows that the world has been generated, since stopping history too soon can limit material availability for embark and trade.
For your first game, generate a new world using the Create new world option in the main menu with the following options:
- World map size at Medium
- History length at 100 years
- Number of Civilizations at Medium
- Number of Sites at Medium
- Number of Beasts at Low
- Natural Savagery at Very Low
- Mineral Occurrence at Everywhere
When it's finished choose Play now, the game will save the world and then ask for a game type, choose Fortress. The game will then quickly simulate two weeks of world activity and then offer a tutorial.
Tutorial
The in game tutorial is quite good and it is strongly suggested that new players play through it at least once. It will automatically choose a site for the fortress as well as dwarves and supplies. It will then show you how to use the interface to strike the earth and get started on your fortress. If a tutorial window is covering a part of the interface you are trying to use, you can roll up the window with the ^ button. You can replay any part of the tutorial at any time by pressing the ? button next the minimap; this also provides a list of non-interactive guides on many parts of the game.
Embark
Embarking is the process of choosing a site, outfitting your initial dwarves, and sending them on their way. If you choose to Start tutorial the game will do it all for you, flashing the location of the site it chose, then skipping straight to your arrival there. It is the quickest way to start.
If you choose Skip tutorial, you'll get some good advice not to ignore any warnings about the site. You can then look around by pointing at locations to see details, zoom in with left click, and zoom out with right click (if any menu is open right click closes it instead.) However, the quickest way to find your own site is by clicking Find embark location (available when the map is zoomed out).
Choosing a Good Site
| This section was migrated from DF2014:Quickstart guide and may be inaccurate for the current version of DF (v50.13). See this page for more information. |
Choosing a good embark site is crucial for beginners. Highly skilled players can run a fortress on an evil glacier, but for now, stick to friendly environments. Look for features in an embark site that will make your first fort easier to manage.
| The world tooltip will only show features from the moused-over tile, but since the embark area covers multiple tiles it can contain multiple biomes. It is very important to inspect all tiles in your site. Each may have significantly different features such as an aquifer or evil biome not initially shown in the info due to not being under the cursor. |
For your first game, find a site with the following properties:
- NO Aquifer (or at least no heavy or varied aquifers. Light is interesting on later embarks, but heavy guarantees Fun!)
- Trees: Woodland or Heavily Forested (or, at the very least, sparsely forested)
- Surroundings: Serene, calm, or at least not any evil or savage biome.
- A River
The following are also good to have, but focus on getting a decent site, not a perfect one.
- Temperature: Warm or Temperate
- Clay or Soil makes farming easier when starting out
- Flux stone layer For your steel industry
- Also avoid sites containing towers, goblins, or other groups at war with you.
See Starting site for more info on why these characteristics are important.
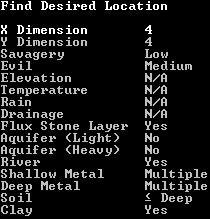
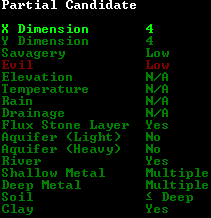
While finding a site is not as simple as world generation, the Find embark location button at the bottom of the screen can help.
Once the find tool has finished searching with matches found, press Esc to look at the results. Any region in which it found a match will be indicated by a green X on the map. Any embark sites matching the criteria will be shown by a rectangle of yellow Xs on the zoomed-in map.
Additionally, when placing the embark area you can resize it using the buttons on-screen. A 4x4 embark (the default) is usually reasonable, but you may want to change the size to avoid an undesirable biome or match your finder criteria.
If you are unable to find a site that you are willing to embark on, you could always create a new world. Otherwise, move on to the next step.
Skills and Equipment
If, at this point, you'd like to get into all of the details of picking individual skills and equipment for your expedition, select Prepare for the journey carefully and see Preparing carefully for instructions. This is completely optional. And preparing carefully makes little difference in the long run, especially without experience as to what to change.
Now the Prepare for the Journey screen should appear. You will be given the choice to either:
- Play Now!
- Prepare for the journey carefully.
In addition, settings are also displayed on the right-hand side. Turn enemies to Off. Selecting Play Now! will start you out with a default set of equipment that is reasonably safe, allowing you to skip having to set up your skills and equipment. If you'd like to get going now, just select that option.
A Minimal Fortress
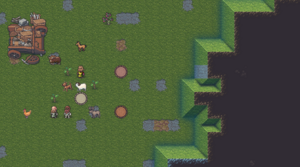
At this point, you have embarked, and your dwarves have arrived at their destination. You will see your dwarves clustered around their wagonful of supplies, somewhere near the center of your map. Immediately hit Space to pause the game unless it is already paused.
Getting your bearings
Do not unpause the game just yet. Take a look around with wasd. Look up and down a few z-levels with the scroll wheel. You can zoom in and out with Ctrl-scroll wheel. Place the cursor on various tiles to familiarize yourself with what the symbols mean. If you get lost, you can press F1 (or Fn-F1 on some systems) to return to the wagon. (You can define more hotkeys later, to jump quickly to other sites of interest.) Notice the terrain features, the vegetation, and any minerals visible. If you chose a site with flowing water, where is it? What about pools of water? The more carefully you examine your site before breaking ground, the better off you will be.
In the bottom left, click the citizens information button to see a list of your dwarves. In the Others tab, you can see any wild animals that may be nearby.
The Stocks button at the top of the screen will show the items owned by your fortress.
On the left, there are buttons for various message logs.
Your wagon serves as the initial meeting area for your dwarves. Since you should have started in a non-freezing, calm (low savagery), non-evil biome, you shouldn't face any immediate danger, but if for some reason the area around your wagon proves to be unsafe, immediately designate another meeting zone (see Temporary Meeting Area below).
Controlling Your Dwarves
The first thing to keep in mind is that, for the most part, you can't directly control your dwarves the way you control characters in a typical fantasy RPG. Instead, you designate things that need to be done and then dwarves with the appropriate labor assignments will decide what to do.
Some tasks receive a higher priority. For example, if a dwarf needs to eat, then he will go eat, and only get around to digging a tunnel once he is done eating. It is also possible to designate things that no dwarf is able to do. For example, if you designate an area to mine, but no dwarf has mining as one of his allowed labors, or no dwarf has a pick, then the mining will never get done, and the game will not always advise you of why.
So, what you are doing throughout the game is essentially giving your dwarves a detailed group-wide to-do list, but it's up to them to figure out which one of them will execute any given task if the task is even possible. Often many of the details of how a task is performed (such as exactly which rock will be used to make crafts) are left up to them.
Labor and work details
You may have noticed that the UI for managing dwarves is a bit difficult to use. There are a few utilities available for this purpose (for Windows, Mac OS X, and most Linux systems):
- Dwarf Therapist (not yet supported for v50) can make labor management considerably easier, especially when you're dealing with twenty times the number of dwarves you have now. It can group and sort dwarves by multiple attributes and display their preferences, mood, and more.
- DFHack includes "Dwarf Manipulator", a UI for managing labors. It has fewer features than Dwarf Therapist, but displays much of the same information and is adequate for normal use. In addition, it is accessible from within DF via u-l, eliminating the need to constantly switch between applications.
Labors are how you control what types of tasks a dwarf is allowed to do. When dwarves are idle, it could be because you haven't given them anything to do, or it could be because none of the idle dwarves have been told that they're allowed to do the types of tasks you've designated. For example, if you designate an area to mine, but none of the dwarves have the mining labor enabled, they will all just sit around ignoring your mining designation, thinking that it isn't their job.
Labors are assigned to dwarves in groups called work details. Open the labor menu from the bottom left to see all the default work details and their assignments.
Fortunately, you don't need to assign a dwarf for every single labor in the game; work details can be set to "everybody does this" to allow any idle dwarf to pick up the job.
While you're here, set the Hunters and Fisherdwarves work details to "nobody does this." Dwarves with these details enabled will constantly be outside attempting to perform them, and for now you don't want dwarves wandering around alone where they can get killed (in addition, they won't be doing anything useful, like hauling).
Also, the default embark comes with three pickaxes: so for efficiency, make sure two dwarves have the Miners detail enabled.
As dwarves perform jobs, they gain skill in those areas which leads to them working faster or producing higher-quality things. Note that any unskilled dwarf can perform any labor given the necessary equipment and materials; they'll just be worse at it.
The default work details contain all the essential labors for the very start of your fortress, but this guide will involve other labors. Keep in mind that at some point you'll have to assign the following labors by creating custom work details:
| Category | Labor |
|---|---|
| Farming/Related | Wood Burning |
| Metalsmithing | Furnace Operating |
| Metalsmithing | Armoring |
| Metalsmithing | Weaponsmithing |
| Metalsmithing | Blacksmithing |
| Metalsmithing | Metalcrafting |
| Jewelry | Gem Cutting |
Strike The Earth!
As you now know, you can't control your dwarves directly. So how do you tell them to get inside your newly dug rooms?
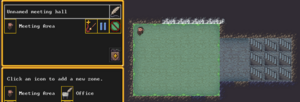
- Meeting Area You can designate a Meeting Area zone inside the new rooms. Press
 z and click "Meeting Area". Draw a rectangle to create a meeting area, then click "Accept". See also the zone page for more information.
 - Stockpiles (see below) Stockpiles tell your dwarves where to put things. Create a stockpile for everything, and dwarves will start to haul all your items there.
Decide where you will build your main entrance. Generally, you will want to get all your dwarves and supplies inside a protected area as quickly as possible. The best strategy is to put the entrance near your wagon to speed up the process of hauling all of your supplies inside.
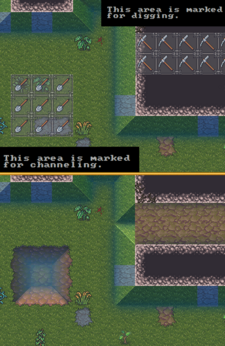
The digging orders menu allows you to select areas to dig. Click the pick axe at the bottom or press ![]() m. There are multiple methods of digging:
m. There are multiple methods of digging:
- Mining (m) removes solid, floor-to-ceiling terrain (natural 'walls') on the z-level selected, leaving behind a rock or soil surface (also referred to as a natural floor). This does not do anything in areas without natural walls (for example, the surface or previously-mined areas).
- Channeling (m-u) removes natural (rock/soil) floors (either created naturally or by mining) and creates a ramp (▲) on the z-level below. Note that you will see a down arrow (▼) on the current z-level, indicating a ramp on the level below. (For best results, ensure that the area below is unrevealed, i.e. black).
To designate an area for digging:
- Hit m to bring up the digging orders menu.
- Hit m to mine or u to channel (see above)
- Draw a rectangular are you want to dig out.
- A rectangle will be highlighted and a miner will start to dig out this area once you unpause the game with Space.
Note that channeling can be dangerous. Unless you know what you're doing, you should only ever make a pit one z-level deep. If you dig a pit multiple z-levels deep, only the lowest level will have an upward ramp, which is not enough for dwarves to leave the pit. (Dwarves can climb out in some circumstances, but this is unreliable.)
| P | i | t | d | e | p | t | h | : | 1 | z | - | l | e | v | e | l | 2 | z | - | l | e | v | e | l | s | 2 | z | - | l | e | v | e | l | s | |||||||||
| G | r | o | u | n | d | → | _ | _ | ▼ | _ | _ | _ | _ | _ | _ | _ | _ | ▼ | _ | ||||||||||||||||||||||||
| ▓ | ▓ | ▲ | ▓ | ▓ | ▓ | ▓ | ▼ | ▓ | ▓ | ▓ | ▓ | ▼ | ▲ | ▓ | |||||||||||||||||||||||||||||
| ▓ | ▓ | ▓ | ▓ | ▓ | ▓ | ▓ | ▲ | ▓ | ▓ | ▓ | ▓ | ▲ | ▓ | ▓ | |||||||||||||||||||||||||||||
| ▓ | ▓ | ▓ | ▓ | ▓ | ▓ | ▓ | ▓ | ▓ | ▓ |
This diagram shows the cross-section (side view) of 1x1 pits channeled 1 z-level deep, 2 z-levels deep and the correct way to do a 2 z-level deep ramp. The appearance of "downward ramps" can be confusing as there is no such thing - the down arrow indicates a ramp on the level below. Dwarves in the first pit can walk up the ramp to ground level and escape, while dwarves in the second pit cannot use the ramp at all. The third pit lets dwarves walk back to the surface again since the two ramps are offset to produce a continued slope. In short, channels (particularly channels multiple z-levels deep) can be dangerous. Digging an entryway from the surface level is one of the few times you'll ever need to channel.
Stairs can also be used for an entryway, but channels allow wagons entry to your fortress.
If your wagon is near a cliff or hill (generally speaking, any difference in levels, usually shown by the existence of natural ramps), you can just designate a tunnel to mine (m) into the cliff to create an entryway. If the wagon is surrounded by flat terrain, channel out a 3x3 rectangle on the surface with m-u to create a sort of pit with ramps on the edges, then go down one z-level with c (or use the mouse scroll wheel) and tunnel into one wall of the pit (with m) to create your entry.
Dig a hallway one tile wide and at least 10 long, ideally more like 20. This will be your entryway.
Your entryway defines the boundary between your safe and protected inner fort, and the big, bad, outside world. You want this to be your only entrance, so that you only have to worry about defending this one opening. A somewhat-outdated video guide to starting a fortress can be found here. (Note that this applies to v0.34.11, not v50.13, so some parts may be inaccurate in the current version.)
Additional miners
Mining will go faster if you have more than one dwarf doing it. By default, only one dwarf has the Mining labor enabled, but this can be changed fairly easily:
- Press
 y to open the labor menu, and select "Miners" on the left side.
 - Choose a dwarf that isn't doing anything especially useful (the fish cleaner is a good choice for a beginning fortress, but you can always change your mind if you end up with a useless peasant later on)
- Click the check box next to the dwarf to enable the mining labor.
- Exit with Esc or right mouse.
The next time you designate an area for mining, both of your miners should start working (assuming they're not busy doing something else).
Notes:
- Each miner requires a pick. A standard embark comes with 3 picks. If you want more than three miners, you'll need to forge more picks (forging is covered later in this guide). Two miners should be adequate for most fortresses, but more miners can add reliability (for when a miner decides to sleep) and speed. For now, you'll almost never need more than two miners, but you'll want more once your fortress expands.
- If you're digging a one-tile-wide hallway, only one miner can work from an end.
- Mining, Wood Cutting, & Hunting labors are mutually exclusive - a dwarf can only have up to one of these professions active at a time. For this reason, it's not recommended to make your only woodcutter a miner, since they won't be able to cut wood anymore.
Delving Secure Lodgings
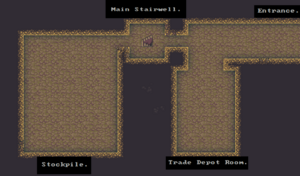
Near the middle of the entry tunnel, build a 5x5 room, and link it to the entrance tunnel with a 3-tile-wide passageway. Expand the main entry tunnel to three tiles wide from the entrance of the new room to the outside entry. At the end of the entry tunnel, dig a small room, which will later become your main stairwell. Two tiles past that, dig a larger room, which will later become your general stockpile, and connect it to the stairwell with a narrow passageway.
Room dimensions
Apart from wagon access (3 tiles wide), the trade depot (5x5), and other workshops (3x3), there are no fixed dimensions you need to worry about. The lower limiting factor is the traffic your tunnels receive (dwarves may have to start climbing over each other), and the space your rooms need (stockpiles, tables/chairs, livestock). The practical maximum size is limited by how long it takes your miners to dig the rooms out, especially if they're digging in stone instead of soil (digging through soil is much faster). Most sites have at least one level soil layer below ground level, which is where you're digging right now, but as you dig deeper you'll hit stone (if you haven't already), and digging will become slower. In most fortresses, even the main hallways never need to be wider than 3 tiles, and needing more than 3 tiles of stairs per floor is very rare. A 3x3 per floor staircase (9 stairs!) is absolute overkill for anything but 20-year-old 300-resident capitals. For most tunnels in your fortress, 2 tiles wide will be sufficient, and many will be fine at just 1 tile wide. 11x11 is a reasonable size for stockpile rooms. However, something smaller is perfectly fine for rarer stockpiles, offices, and small dining rooms. Commoners’ bedrooms need not be larger than the amount of furniture you want inside.
Mining safety
While mining, take care to avoid digging into water. Dwarves are usually poor swimmers, and are unlikely to escape from an underground flood. However, it is safe to mine next to underground water, as long as you leave at least one "wall" tile between them (see the picture to the right). You can also mine one z-level under a body of water (for example, mining under a river), but you will have to designate each tile individually because DF automatically cancels digging of newly-revealed "damp" tiles (tiles are considered damp when they are adjacent to a water tile, regardless of whether the water tile is on the same z-level or not).
Also note that water can flow diagonally:
| ≈ | ▓ | . | ▓ | ≈ | ▓ | . | ▓ | ||||
| ▓ | ▓ | . | ▓ | ▓ | . | . | ▓ | ||||
| o | k | f | l | o | o | d |
Stockpiles
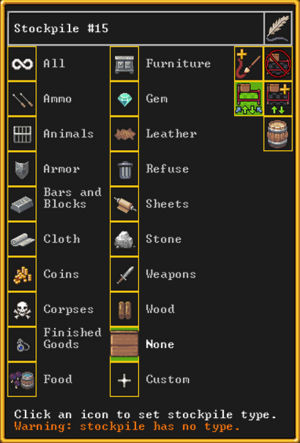
Stockpiles are very important. These areas are where your dwarves will drop things for storage when they aren't needed elsewhere. To create a general purpose stockpile for your first storage area:
- Hit
 p to open the Stockpiles menu.
 - Click the plus sign at the bottom to add a new stockpile.
- Draw a rectangle and click "Accept".
- Click "Custom" to change the goods that the stockpile accepts. Enable everything but Corpses, Refuse, Stone, Gems, and Wood. To do this, first click "All" in the top left to enable everything, then go through each type you want to exclude, and click "None" in the top-center of the screen. This will reject all goods of that type.
- Esc or right mouse twice to exit the stockpiles menu.
Once you exit the stockpiles menu and unpause, you should see dwarves running off to haul everything from your wagon into the new stockpile area. Later, if you like, you can change what sort of things the stockpile accepts by hitting p, clicking on the stockpile, then changing the stockpile settings as above.
It is particularly important to keep wood, stone, refuse, and corpses out of your general purpose stockpile, so you may want to double check to make sure all of these things are disabled in the stockpile settings. Failure to keep these things out of this stockpile will rapidly fill it up, causing workshops to become cluttered when dwarves can't store things in the stockpile. Note: When assigning stockpiles, you should make sure they're in a vacant area (i.e. the tiles should not have any items already stored on them). Dwarves will not haul items to occupied tiles, so make sure the area is vacant (and already mined out) before assigning a stockpile.
Stairways
In Dwarf Fortress, every z-level is composed of a floor and a wall (or "space between floors"). The confusingly named "down" and "up" stairs have nothing to do with the direction creatures can move to; instead, down stairs penetrate floors, while up stairs penetrate walls. Up/down stairs penetrate the wall and the floor below. (note the picture to the left)
When you designate a staircase to be dug out, the top level will be down-stairs, any inner levels will be up/down stairs, and the bottom level will be up-stairs.
Dig a stairway in the room you dug out for the stairwell (not the 5x5 room that you dug out earlier): press m-t, click on the floor of the room to start the staircase, scroll down one level, and click again to finish designating the staircase. This will create down-stairs on the top level, and up-stairs on the level below. To continue digging downwards later, you can designate another staircase (m-t) starting on the lowest exposed level and continuing downwards. For now just dig down one level.
Temporary Meeting Area
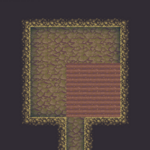
On the second z-level below ground (the one below the stockpile level, which you just reached with the staircase), dig a short, 3-tile wide passageway (this only needs to be 1-2 tiles long). Past that, dig out a room between 5x5 and 7x7, leaving room to enlarge it in at least one direction in the future. Using the ![]() z key, create a meeting area in the room you just created, filling the entire room (be careful not to make this too small lest your overcrowded animals start fighting). This works much like creating a stockpile except that you define what the area is for before you draw the rectangle. Select "Meeting area", draw the rectangle, filling the entire room, and click "Accept". Your idle dwarves will hang around in this area, hopefully keeping them inside the fort and out of trouble.
z key, create a meeting area in the room you just created, filling the entire room (be careful not to make this too small lest your overcrowded animals start fighting). This works much like creating a stockpile except that you define what the area is for before you draw the rectangle. Select "Meeting area", draw the rectangle, filling the entire room, and click "Accept". Your idle dwarves will hang around in this area, hopefully keeping them inside the fort and out of trouble.
NOTE: Again, make sure your activity zone is already mined out before attempting to designate the meeting area.
Refuse

Outside your fort entrance, use ![]() p and click the "plus stockpile" icon to create a stockpile for refuse (trash can icon) at least 5x5 in size. This should be outside in the open or you will have problems with Miasma. If you do not disable vermin (Item Types -> remains), you will probably have to expand it later as it will fill up with vermin remains rather quickly. If you are seeing refuse appear in your general-purpose stockpile instead of the refuse pile, click on the general stockpile and check its custom settings to make sure refuse has been disabled.
p and click the "plus stockpile" icon to create a stockpile for refuse (trash can icon) at least 5x5 in size. This should be outside in the open or you will have problems with Miasma. If you do not disable vermin (Item Types -> remains), you will probably have to expand it later as it will fill up with vermin remains rather quickly. If you are seeing refuse appear in your general-purpose stockpile instead of the refuse pile, click on the general stockpile and check its custom settings to make sure refuse has been disabled.
Food
Food is necessary for your dwarves' survival - to keep functioning, they require constant supplies of food and drink - the amount of food and drink currently available is displayed in the status bar at the top of the screen. Luckily, your dwarves will eat almost everything raw, including plants.
Farming
For a reliable, long-term food and alcohol supply, you'll need to set up a farm. Dig out a medium-sized room in a soil layer (including sand, clay, loam, silt, peat, and ooze) accessible from inside your existing fortress. 5x5 is a good size to start with, but you'll want to leave room to expand in at least one direction. You must pick an underground area with mud or soil*. Placing this near the stockpiles is more efficient, since farmers won't need to travel as far.
* Hopefully you have chosen a site with a soil layer, which will make farming much easier, but if not you will need to irrigate to create the required mud on stone floors.
Use ![]() b-
b-![]() o-
o-![]() f-
f-![]() p to build a 3x3 farm plot in the room you just created. Position the farm plot ideally near the wall to leave space for more plots later on.
p to build a 3x3 farm plot in the room you just created. Position the farm plot ideally near the wall to leave space for more plots later on.
The Planters work detail must be enabled for at least one dwarf, or the farm plot won't get built and farming will not take place. By default, Planters is set to "Everybody does this", so there's no need to change this now.
