- v50 information can now be added to pages in the main namespace. v0.47 information can still be found in the DF2014 namespace. See here for more details on the new versioning policy.
- Use this page to report any issues related to the migration.
User:Mixtrak/Strategy/part 2
So you've chosen your civilisation, your site, and your embark loadout. You've arrived, and are ready to strike the earth. What should you do first?
Get the hell inside.
Well, first make an inside, then get the hell in there. Dwarf Fortress is one of those games where anything can happen, and it has no concept of "fair". It's perfectly possible to arrive at a nice-looking location and for all your dwarves to be almost immediately slaughtered. The danger could be wild beasts, bandits, the undead, hostile civilisations, monsters, you name it. Fortunately, none of them can dig.
Checking for Threats
So the first order of business is to pause the game (you have paused, haven't you? Maybe go re-read the Quickstart Guide…) and check your surroundings for threats. On a nice embark, there should be nothing more exciting than some fairly mundane wildlife.
If, however, there's anything more interesting on the prowl, you have three options. The first is to proceed with your fortress, but do it really fast and pray you get everything underground before the threat spots you. The second, if it looks particularly interesting, is to run like hell to the opposite edge of the map and do the same, which is awkward (your supplies are all back in the middle of the map, and you'll struggle without them), but can save your bacon. Make sure you take your picks, at least, or you'll be well and truly buggered. The third is all-out attack. Check what the wiki says about this particular threat and decide accordingly. If you get sealed in without supplies, you may have to make a race down to the caverns for food, and then find a way to kill the threat because you won't get very far without your anvil or access to the surface to trade for an anvil. There's some general suggestions at the end of this page.
However, assuming all goes well, it's time indeed to strike the earth...
Designating Layout
The first thing is to designate your wagon for removal, so you can use its logs. This is a task for your carpenter, so don't go distracting them with any tree-felling jobs or anything. Next, turn off your miners' hauling labours - they need to focus!
Now before we start chucking things about it's important to make a plan for where everything is going to go. Feel free to come up with your own design, but there's a particular layout I'm going to recommend because it's quite efficient, secure and flexible. I'll illustrate with diagrams, each of which shows a bird's-eye view - that is, overseer perspective - of a single layer.
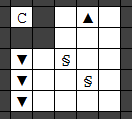
First, count tiles to find the centre of the map. This is the location of the central axis of your spiral ramp descending down into the fortress, but don't dig right here. The entrance should be approximately three tiles away, in any cardinal direction (north, south, east, west). In these diagrams, I've chosen east. On that single tile, designate a channel in the ground. That tile will flash with the underscore character.
![]()
Legend:
C = central map square (illustrative only)
_ = channel tile for fort entrance
This instructs your miners create a down-ramp to the layer below. It's also simple to adapt this design for tunnelling into the side of a slope, but read ahead first to make sure you understand the principles.
A narrow entrance causes a little congestion, but is easier to seal up, which is our current priority. Making a completely secure entrance will come later, because it requires mechanics and other things we might not have time for. For now, we just need to get underground, and batten down the hatches as best we can.
Now we have some coordinates by which to orient ourselves, we need to designate a few stockpiles and zones nearby. First, find the nearest flowing water tile and, on the single bank tile adjacent to the water tile, designate a water source.
Next, you'll need a combined stockpile for refuse and corpses (r in the following diagram) and a pasture zone (p):

Later, that gap in the bottom-right corner will hold your trade depot. The refuse pile is necessary because dead matter stored underground will rot, which makes your dwarves unhappy. And the pasture is - duh - so that your grazing animals don't starve for lack of Grass. If your map doesn't have grass in the middle here, you'll need to find some nearby. Go ahead and assign your sheep (or other grazing animals) to that pasture zone.
Now it's time to go down a layer and designate the next set of digging, which should look like this:

Note that we're not mining directly under the channel - otherwise you risk mining away the up-ramps which channels produce and your miners will be stuck.
We actually are going to repeat this pattern, spiralling down, for a few more layers. Generally, it's a good strategy to leave a buffer zone of un-mined layers between the surface and your fort, for several reasons. In the layer immediately under the surface, tree roots penetrate the soil and leave gaps which are security vulnerabilities when the trees are cut down. You can patch them up but eventually the whole roof of soil will be replaced with paving, and that means no more trees or plants for you to harvest. Also, undermining murky pools and rivers results in annoying announcements and designation cancellations. You can override these, but then you risk accidentally puncturing the roof and flooding your fortress. But the final, and most important reason, is flexibility. If you later want to dig a moat around your fortress entrance, having a buffer of un-mined layers avoids annoying fortress remodelling.
That said, I'd recommend repeating the spiral pattern until you're at least five layers beneath the lowest water-point on the map. So the next layer would look like so:

And so on. This might seem like a lot more work than just digging a shaft, but it has advantages:
- If you want to bring trade wagons inside at some later point, they can get down the ramp
- Falling dwarves fall right through stairs, but not ramps
- The spiral design ensures that there's no consecutive layers of mined tiles on top of one another, which means falling stone won't punch a hole right down to the bottom of the shaft
- Plenty of room for dwarves to move around and for any future needs (decoration, levers, temporary stockpiles etc.)
A little extra digging now will save you time and remodelling in the long run. A stitch in time, as they say.
Once you're down deep enough (Again, I recommend using the 5th level below the lowest water level on your map), we're ready to actually begin digging the fortress blueprint. First, designate a large 11 x 11 room on the next level down, centred on the central map tile:

In that diagram and all diagrams going forward, I've replaced the channelling designations with triangles pointing down, because that's how they'll look when they're ramps. Similarly, completed up-ramps look like up-triangles, but you don't have to designate these - they'll be automatically created when the layer above gets channelled. Make sure the location of up and down ramps on each level lines up! Those three dark squares are un-designated because they provide support and are necessary for the ramps to function. It's a little confusing, so go read Ramp and Channel if you're not following.
You can unpause now.
Getting to work
Your miners should dig this out pretty quickly, especially if you have a few layers of soil so they're not digging straight down into rock. Still, after deconstructing the wagon and pasturing the livestock your other dwarves may find themselves milling about while they wait for the miners. Resist the urge to assign them busy-work such as chopping trees or collecting plants - that will come soon enough. But there are some jobs which should absolutely be done as soon as possible:
- Once the first level of the stairwell is complete, build two ropes as restraints on the diagonal extending out from the inner corner, like so:
- Then assign your one of your war dogs to each rope. They can roam within 1 tile of the restraint, but no configuration leaves a gap for anything to sneak through.

- Once the cart is deconstructed, make a carpenter's workshop (on the surface or, if things are looking dicey, in the stairwell) from one of the logs, then use that to make a wooden hatch from another log. Install the hatch over your one-tile, surface-level entrance. Congratulations! You now have a lockable front door. It won't stop thieves and building destroyers, but at least you can exclude a fair bit of dangerous stuff.
- You'll probably want to forbid the soap so your wasteful dwarves don't use it on such frippery as "personal hygiene". That's for hospital use only, Urist!
If you've done all this and your miners still have a long ways to go, by all means designate a few nearby trees for felling and/or plants for gathering while you wait, but don't get carried away. You'll want a small, temporary stockpile nearby for the wood and food.
Soon, however, your miners should be finished with the large 11 x 11 room. Pause the game and fill the room with an "everything stockpile" for food, cloth, furniture, finished goods, and every other category of goods you brought with you. Exclude stone (which will just clutter it up), refuse and corpses (which will cause other objects to decay!). Remove any temporary stockpiles on the surface (except the corpse/refuse pile).
Then, in the same room, designate a 3 x 3 pasture and assign your blue peafowl, to keep them safely inside. It's bad to crowd animals, as they get aggressive, but unless you brought a bunch more non-grazing animals this small pasture should be enough. Finally, in the same room, designate an 8 x 8 zone for a meeting area which does not overlap with the pasture (again, crowding animals = bad). Idle dwarves will congregate here, safely underground. You can leave the cat without a pasture - it should mostly prowl around your stockpiled food, protecting it from vermin.
Temporarily re-enable hauling labours on your miners so they can help bring stuff inside, cancel any wood-cutting or plant-gathering designations, un-forbid the soap, and unpause. Your dwarves should rush to get everything into the stockpile. When that's done, you can pause again, re-forbid the soap, and once again disable hauling for your miners.
Made it!
Of course, things might not have gone to plan. If something arrives at your fort and either a) it won't go away, so you can't safely access the surface or b) it's a Building Destroyer and it's coming this way and oh Armok it's breaking down the hatch… you'll have to engineer a more permanent solution. That's beyond the scope of this guide because it constitutes a fairly substantial deviation from The Plan, but the most general and powerful approach is as follows.
First, protect yourself from building destroyers. First, make sure your dwarves are all inside, then mine away the single up-ramp to the surface, and replace it with a wall constructed of mining stone (you should have some by now). Second, you need to engineer Cave-in traps, then lure the thing(s) into them and activate them. There's a lot of ways to do this but a word to the wise: either make it so the traps and fortress access can be activated remotely, from behind a walled-in fallback position, or don't bloody well miss. Make more and bigger traps than you think you need, especially if you might only get one shot. Once the dust has settled, scrape the interloper off the geology and try to pick up where you left off.
Worst case scenario, if you didn't heed my advice and find yourself in a location where the surface is chronically unsafe, well, your best bet is to try to make a home in the caverns and hope your seven dwarves really, really like one another… but that's another section in this guide.