- v50 information can now be added to pages in the main namespace. v0.47 information can still be found in the DF2014 namespace. See here for more details on the new versioning policy.
- Use this page to report any issues related to the migration.
Difference between revisions of "Ocean"
(Added images.) |
|||
| (29 intermediate revisions by 10 users not shown) | |||
| Line 1: | Line 1: | ||
| − | {{Quality|Exceptional| | + | {{Quality|Exceptional|20:13, 17 February 2023 (CST)}} |
| − | + | {{av}} | |
| − | + | [[File:ocean_v50_preview.png|thumb|150px|right|Voted "#3 worst place to embark" in 78 AD.]]An '''ocean''' is an immense volume of [[Water#Salt water|salt water]]. Oceans are often bordered by [[sand|sandy beaches]], where [[driftwood]] can be found. [[Marsh]]es and [[swamp]]s also tend to form around oceanic coastlines, especially near [[river]]s. The land surrounding oceans also tends to have a high water table, resulting in [[aquifer]]s close to the surface. | |
| − | An '''ocean''' is an immense volume of [[Water#Salt water|salt water]]. Oceans are often bordered by [[sand|sandy beaches]], where [[driftwood]] can be found. [[Marsh]]es and [[swamp]]s also tend to form around oceanic coastlines, especially near [[river]]s. The land surrounding oceans also tends to have a high water table, resulting in [[aquifer]]s close to the surface | ||
| − | |||
| − | |||
Oceans are an excellent source of [[Creature#Aquatic|food]] for a new fortress, usually having tons of fish, and contain shell-bearing creatures like [[oyster]]s and [[mussel]]s. However, sometimes when you embark on a coast, you might receive announcements like "There is nothing to catch in <some area>". If this happens, you won't be able to fish in the ocean in this embark; you may wish to abandon the fort and start again elsewhere. | Oceans are an excellent source of [[Creature#Aquatic|food]] for a new fortress, usually having tons of fish, and contain shell-bearing creatures like [[oyster]]s and [[mussel]]s. However, sometimes when you embark on a coast, you might receive announcements like "There is nothing to catch in <some area>". If this happens, you won't be able to fish in the ocean in this embark; you may wish to abandon the fort and start again elsewhere. | ||
There are three varieties of oceans, based on temperature, which affects the sea life found there: Arctic, Temperate and Tropical. Oceans in a [[freezing]] climate (usually arctic oceans) will freeze, just like [[river]]s and [[pool]]s, acting like a [[glacier]]. | There are three varieties of oceans, based on temperature, which affects the sea life found there: Arctic, Temperate and Tropical. Oceans in a [[freezing]] climate (usually arctic oceans) will freeze, just like [[river]]s and [[pool]]s, acting like a [[glacier]]. | ||
| + | |||
| + | While by default it's impossible to embark in an ocean biome exclusively, DFHack offers an option to bypass this restriction. However, in order to found a fort, one must also embark on a site that is at least partly Arctic ocean, to provide ice for an initial foothold. | ||
== Ocean waves == | == Ocean waves == | ||
| − | Waves will periodically wash over the coast | + | [[File:arctic_ocean_v50_preview.png|thumb|150px|right|Best place to keep alcohol cold.]]Waves will periodically wash over the coast - the tiles will not get wet. However, if a wave washes over a ''staircase'', the floors below it will be slowly flooded. [[Cave moss]] will not grow in the mud left by salt water. The waves move over all natural tiles, and seem to move independently of constructed tiles like walls and floors. Be mindful not to carve away natural walls and allow tide to enter your fort, and cause excess slowdown. Sea walls can be built to block waves and protect beach areas, but need to be completely closed off to be effective. Waves also have a tendency to move items left on the beach, so it is inadvisable to place stockpiles too close to the shore—also beware that this effect means that dwarves can be knocked unconscious if hit by driftwood washed in from waves. |
Since ocean waves do not actually move the water in the tiles below them, they do not create [[flow]]. Thus, waves ''cannot'' power a [[water wheel]], making tidal energy generation much more difficult. | Since ocean waves do not actually move the water in the tiles below them, they do not create [[flow]]. Thus, waves ''cannot'' power a [[water wheel]], making tidal energy generation much more difficult. | ||
In [[adventure mode]], being pushed by ocean waves occasionally increases [[swimming]] skill without the risk of drowning. | In [[adventure mode]], being pushed by ocean waves occasionally increases [[swimming]] skill without the risk of drowning. | ||
| + | |||
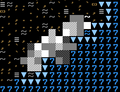
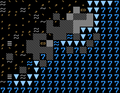
| + | <gallery> | ||
| + | File:An Ocean Wave Forms.png|The formation of an ocean wave. (All of these images are in ASCII mode.) | ||
| + | File:An Ocean Wave Rises.png|The wave rises higher out of the water. | ||
| + | File:An Ocean Wave Crashes.png|The wave crashes onto the beach. | ||
| + | File:An Ocean Wave Disolves.png|The mist from the wave disperses. | ||
| + | File:An Ocean Wave Disappears.png|The wave leaves behind just a puddle. | ||
| + | </gallery> | ||
== Ocean floor geology == | == Ocean floor geology == | ||
| − | The ocean floor will be made up of entire layers of, or combinations of the following: | + | The ocean floor will be made up of entire layers of, or combinations of, the following: |
* A [[sedimentary layer]] of [[conglomerate]], [[limestone]], [[sandstone]], or [[shale]] | * A [[sedimentary layer]] of [[conglomerate]], [[limestone]], [[sandstone]], or [[shale]] | ||
* A [[soil]] layer of [[calcareous ooze]], [[pelagic clay]], or [[siliceous ooze]] | * A [[soil]] layer of [[calcareous ooze]], [[pelagic clay]], or [[siliceous ooze]] | ||
| Line 26: | Line 33: | ||
== Resources == | == Resources == | ||
| − | Almost all tiles next to oceans have aquifers, which require fairly complicated schemes to sidestep. In addition, oceans are salt water resources, requiring desalination with a [[screw pump]] into a [[cistern]] to use for drinking. On the other hand you have an inexhaustible source of water for fishing, drowning chambers, and so forth, as well as a spawning point for some very big and very meat-profitable [[creature]]s: [[sperm whale]]s, [[orca]]s, and the like. | + | Almost all tiles next to oceans have aquifers, which require fairly complicated schemes to sidestep. In addition, oceans are salt water resources, requiring desalination with a [[screw pump]] into a [[cistern]] to use for drinking. On the other hand, you have an inexhaustible source of water for fishing, drowning chambers, and so forth, as well as a spawning point for some very big and very meat-profitable [[creature]]s: [[sperm whale]]s, [[orca]]s, and the like. |
== Wildlife == | == Wildlife == | ||
| − | In arctic oceans with [[Climate#Freezing|freezing]] climate, none of the aquatic vermin or creatures will be present when the water freezes over. This leaves only terrestrial and amphibious animals to appear because they are able to live on land. | + | In arctic oceans, with a by-definition [[Climate#Freezing|freezing]] climate, none of the aquatic vermin or creatures will be present when the water freezes over. This leaves only terrestrial and amphibious animals to appear, because they are able to live on land. |
=== Creatures === | === Creatures === | ||
{| class="wikitable" | {| class="wikitable" | ||
! Name | ! Name | ||
| + | ! Graphic | ||
! Arctic ocean !! Temperate ocean !! Tropical ocean | ! Arctic ocean !! Temperate ocean !! Tropical ocean | ||
|- | |- | ||
| {{Tile|a|7:1}} [[Albatross]] | | {{Tile|a|7:1}} [[Albatross]] | ||
| + | | style="text-align:center;"|[[File:albatross_sprite.png]] | ||
| {{check}} || {{check}} || {{check}} | | {{check}} || {{check}} || {{check}} | ||
|- | |- | ||
| {{Tile|s|6:0}} [[Angelshark]] | | {{Tile|s|6:0}} [[Angelshark]] | ||
| + | | style="text-align:center;"|[[File:angelshark_sprite.png]] | ||
| || {{check}} || {{check}} | | || {{check}} || {{check}} | ||
|- | |- | ||
| {{Tile|S|7:0}} [[Basking shark]] | | {{Tile|S|7:0}} [[Basking shark]] | ||
| + | | style="text-align:center;"|[[File:basking_shark_sprite.png]] | ||
| || {{check}} || | | || {{check}} || | ||
|- | |- | ||
| {{Tile|s|0:1}} [[Blacktip reef shark]] | | {{Tile|s|0:1}} [[Blacktip reef shark]] | ||
| + | | style="text-align:center;"|[[File:blacktip_reef_shark_sprite.png]] | ||
| || || {{check}} | | || || {{check}} | ||
|- | |- | ||
| {{Tile|S|1:1}} [[Blue shark]] | | {{Tile|S|1:1}} [[Blue shark]] | ||
| + | | style="text-align:center;"|[[File:blue_shark_sprite.png]] | ||
| {{check}} || {{check}} || {{check}} | | {{check}} || {{check}} || {{check}} | ||
|- | |- | ||
| {{Tile|α|1:1}} [[Bluefin tuna]] | | {{Tile|α|1:1}} [[Bluefin tuna]] | ||
| + | | style="text-align:center;"|[[File:bluefin_tuna_sprite.png]] | ||
| {{check}} || {{check}} || {{check}} | | {{check}} || {{check}} || {{check}} | ||
|- | |- | ||
| {{Tile|α|3:1}} [[Bluefish]] | | {{Tile|α|3:1}} [[Bluefish]] | ||
| + | | style="text-align:center;"|[[File:bluefish_sprite.png]] | ||
| || {{check}} || {{check}} | | || {{check}} || {{check}} | ||
|- | |- | ||
| {{Tile|S|7:1}} [[Bull shark]] | | {{Tile|S|7:1}} [[Bull shark]] | ||
| + | | style="text-align:center;"|[[File:bull_shark_sprite.png]] | ||
| || || {{check}} | | || || {{check}} | ||
|- | |- | ||
| {{Tile|α|7:0}} [[Cod]] | | {{Tile|α|7:0}} [[Cod]] | ||
| + | | style="text-align:center;"|[[File:cod_sprite.png]] | ||
| {{check}} || {{check}} || | | {{check}} || {{check}} || | ||
|- | |- | ||
| {{Tile|C|1:1}} [[Coelacanth]] | | {{Tile|C|1:1}} [[Coelacanth]] | ||
| + | | style="text-align:center;"|[[File:coelacanth_sprite.png]] | ||
| || || {{check}} | | || || {{check}} | ||
|- | |- | ||
| {{Tile|ò|6:0}} [[Common skate]] | | {{Tile|ò|6:0}} [[Common skate]] | ||
| + | | style="text-align:center;"|[[File:common_skate_sprite.png]] | ||
| || {{check}} || {{check}} | | || {{check}} || {{check}} | ||
|- | |- | ||
| {{Tile|~|7:0}} [[Conger eel]] | | {{Tile|~|7:0}} [[Conger eel]] | ||
| + | | style="text-align:center;"|[[File:conger_eel_sprite.png]] | ||
| {{check}} || {{check}} || | | {{check}} || {{check}} || | ||
|- | |- | ||
| {{Tile|c|4:1}} [[Crab]] | | {{Tile|c|4:1}} [[Crab]] | ||
| + | | style="text-align:center;"|[[File:crab_sprite.png]] | ||
| {{check}} || {{check}} || {{check}} | | {{check}} || {{check}} || {{check}} | ||
|- | |- | ||
| {{Tile|S|6:0}} [[Elephant seal]] | | {{Tile|S|6:0}} [[Elephant seal]] | ||
| + | | style="text-align:center;"|[[File:elephant_seal_sprite.png]] | ||
| {{check}} || || | | {{check}} || || | ||
|- | |- | ||
| {{Tile|p|7:1}} [[Emperor penguin]] | | {{Tile|p|7:1}} [[Emperor penguin]] | ||
| + | | style="text-align:center;"|[[File:emperor_penguin_sprite.png]] | ||
| {{check}} || || | | {{check}} || || | ||
|- | |- | ||
| {{Tile|s|3:0}} [[Frill shark]] | | {{Tile|s|3:0}} [[Frill shark]] | ||
| + | | style="text-align:center;"|[[File:frill_shark_sprite.png]] | ||
| {{check}} || {{check}} || {{check}} | | {{check}} || {{check}} || {{check}} | ||
|- | |- | ||
| {{Tile|G|1:0}} [[Giant grouper]] | | {{Tile|G|1:0}} [[Giant grouper]] | ||
| + | | style="text-align:center;"|[[File:giant_grouper_sprite.png]] | ||
| || || {{check}} | | || || {{check}} | ||
|- | |- | ||
| {{Tile|b|2:0}} [[Great barracuda]] | | {{Tile|b|2:0}} [[Great barracuda]] | ||
| + | | style="text-align:center;"|[[File:great_barracuda_sprite.png]] | ||
| || || {{check}} | | || || {{check}} | ||
|- | |- | ||
| {{Tile|S|7:1}} [[Great white shark]] | | {{Tile|S|7:1}} [[Great white shark]] | ||
| + | | style="text-align:center;"|[[File:great_white_shark_sprite.png]] | ||
| || {{check}} || {{check}} | | || {{check}} || {{check}} | ||
|- | |- | ||
| {{Tile|α|6:0}} [[Halibut]] | | {{Tile|α|6:0}} [[Halibut]] | ||
| + | | style="text-align:center;"|[[File:halibut_sprite.png]] | ||
| {{check}} || {{check}} || | | {{check}} || {{check}} || | ||
|- | |- | ||
| {{Tile|S|6:0}} [[Hammerhead shark]] | | {{Tile|S|6:0}} [[Hammerhead shark]] | ||
| + | | style="text-align:center;"|[[File:hammerhead_shark_sprite.png]] | ||
| || {{check}} || {{check}} | | || {{check}} || {{check}} | ||
|- | |- | ||
| {{Tile|H|7:0}} [[Harp seal]] | | {{Tile|H|7:0}} [[Harp seal]] | ||
| + | | style="text-align:center;"|[[File:harp_seal_sprite.png]] | ||
| {{check}} || || | | {{check}} || || | ||
|- | |- | ||
| {{Tile|c|6:0}} [[Horseshoe crab]] | | {{Tile|c|6:0}} [[Horseshoe crab]] | ||
| + | | style="text-align:center;"|[[File:horseshoe_crab_sprite.png]] | ||
| {{check}} || {{check}} || {{check}} | | {{check}} || {{check}} || {{check}} | ||
|- | |- | ||
| {{Tile|L|0:1}} [[Leopard seal]] | | {{Tile|L|0:1}} [[Leopard seal]] | ||
| + | | style="text-align:center;"|[[File:leopard_seal_sprite.png]] | ||
| {{check}} || || | | {{check}} || || | ||
|- | |- | ||
| {{Tile|p|1:1}} [[Little penguin]] | | {{Tile|p|1:1}} [[Little penguin]] | ||
| + | | style="text-align:center;"|[[File:little_penguin_sprite.png]] | ||
| {{check}} || || | | {{check}} || || | ||
|- | |- | ||
| {{Tile|S|3:1}} [[Longfin mako shark]] | | {{Tile|S|3:1}} [[Longfin mako shark]] | ||
| + | | style="text-align:center;"|[[File:longfin_mako_shark_sprite.png]] | ||
| || {{check}} || {{check}} | | || {{check}} || {{check}} | ||
|- | |- | ||
| {{Tile|►|7:0}} [[Manta ray]] | | {{Tile|►|7:0}} [[Manta ray]] | ||
| + | | style="text-align:center;"|[[File:manta_ray_sprite.png]] | ||
| || || {{check}} | | || || {{check}} | ||
|- | |- | ||
| {{Tile|α|1:1}} [[Marlin]] | | {{Tile|α|1:1}} [[Marlin]] | ||
| + | | style="text-align:center;"|[[File:marlin_sprite.png]] | ||
| || {{check}} || {{check}} | | || {{check}} || {{check}} | ||
|- | |- | ||
| {{Tile|α|3:1}} [[Milkfish]] | | {{Tile|α|3:1}} [[Milkfish]] | ||
| + | | style="text-align:center;"|[[File:milkfish_sprite.png]] | ||
| || || {{check}} | | || || {{check}} | ||
|- | |- | ||
| {{Tile|N|7:0}} [[Narwhal]] | | {{Tile|N|7:0}} [[Narwhal]] | ||
| + | | style="text-align:center;"|[[File:narwhal_sprite.png]] | ||
| {{check}} || || | | {{check}} || || | ||
|- | |- | ||
| {{Tile|S|6:0}} [[Nurse shark]] | | {{Tile|S|6:0}} [[Nurse shark]] | ||
| + | | style="text-align:center;"|[[File:nurse_shark_sprite.png]] | ||
| || {{check}} || | | || {{check}} || | ||
|- | |- | ||
| {{Tile|α|3:0}} [[Ocean sunfish]] | | {{Tile|α|3:0}} [[Ocean sunfish]] | ||
| + | | style="text-align:center;"|[[File:ocean_sunfish_sprite.png]] | ||
| || {{check}} || {{check}} | | || {{check}} || {{check}} | ||
|- | |- | ||
| {{Tile|o|7:0}} [[Octopus]] | | {{Tile|o|7:0}} [[Octopus]] | ||
| + | | style="text-align:center;"|[[File:octopus_sprite.png]] | ||
| {{check}} || {{check}} || {{check}} | | {{check}} || {{check}} || {{check}} | ||
|- | |- | ||
| {{Tile|α|4:1}} [[Opah]] | | {{Tile|α|4:1}} [[Opah]] | ||
| + | | style="text-align:center;"|[[File:opah_sprite.png]] | ||
| || {{check}} || {{check}} | | || {{check}} || {{check}} | ||
|- | |- | ||
| {{Tile|O|0:1}} [[Orca]] | | {{Tile|O|0:1}} [[Orca]] | ||
| + | | style="text-align:center;"|[[File:orca_sprite.png]] | ||
| {{check}} || {{check}} || {{check}} | | {{check}} || {{check}} || {{check}} | ||
|- | |- | ||
| {{Tile|o|7:1}} [[Osprey]] | | {{Tile|o|7:1}} [[Osprey]] | ||
| + | | style="text-align:center;"|[[File:osprey_sprite.png]] | ||
| {{check}} || {{check}} || {{check}} | | {{check}} || {{check}} || {{check}} | ||
|- | |- | ||
| {{Tile|p|0:1}} [[Penguin]] | | {{Tile|p|0:1}} [[Penguin]] | ||
| + | | style="text-align:center;"|[[File:penguin_sprite.png]] | ||
| {{check}} || || | | {{check}} || || | ||
|- | |- | ||
| {{Tile|p|0:1}} [[Puffin]] | | {{Tile|p|0:1}} [[Puffin]] | ||
| + | | style="text-align:center;"|[[File:puffin_sprite.png]] | ||
| {{check}} || || | | {{check}} || || | ||
|- | |- | ||
| {{Tile|~|0:1}} [[Sea lamprey]] | | {{Tile|~|0:1}} [[Sea lamprey]] | ||
| + | | style="text-align:center;"|[[File:sea_lamprey_sprite.png]] | ||
| {{check}} || {{check}} || | | {{check}} || {{check}} || | ||
|- | |- | ||
| {{Tile|o|6:0}} [[Sea otter]] | | {{Tile|o|6:0}} [[Sea otter]] | ||
| + | | style="text-align:center;"|[[File:sea_otter_sprite.png]] | ||
| || {{check}} || | | || {{check}} || | ||
|- | |- | ||
| {{Tile|S|3:1}} [[Shortfin mako shark]] | | {{Tile|S|3:1}} [[Shortfin mako shark]] | ||
| + | | style="text-align:center;"|[[File:shortfin_mako_shark_sprite.png]] | ||
| || {{check}} || {{check}} | | || {{check}} || {{check}} | ||
|- | |- | ||
| {{Tile|W|7:0}} [[Sperm whale]] | | {{Tile|W|7:0}} [[Sperm whale]] | ||
| + | | style="text-align:center;"|[[File:sperm_whale_sprite.png]] | ||
| {{check}} || {{check}} || {{check}} | | {{check}} || {{check}} || {{check}} | ||
|- | |- | ||
| {{Tile|s|6:0}} [[Spiny dogfish]] | | {{Tile|s|6:0}} [[Spiny dogfish]] | ||
| + | | style="text-align:center;"|[[File:spiny_dogfish_sprite.png]] | ||
| || {{check}} || {{check}} | | || {{check}} || {{check}} | ||
|- | |- | ||
| {{Tile|s|4:1}} [[Sponge]] | | {{Tile|s|4:1}} [[Sponge]] | ||
| + | | style="text-align:center;"|[[File:sponge_sprite.png]] | ||
| {{check}} || {{check}} || {{check}} | | {{check}} || {{check}} || {{check}} | ||
|- | |- | ||
| {{Tile|S|6:0}} [[Spotted wobbegong]] | | {{Tile|S|6:0}} [[Spotted wobbegong]] | ||
| + | | style="text-align:center;"|[[File:spotted_wobbegong_sprite.png]] | ||
| || {{check}} || {{check}} | | || {{check}} || {{check}} | ||
|- | |- | ||
| {{Tile|ò|7:0}} [[Stingray]] | | {{Tile|ò|7:0}} [[Stingray]] | ||
| + | | style="text-align:center;"|[[File:stingray_sprite.png]] | ||
| || || {{check}} | | || || {{check}} | ||
|- | |- | ||
| {{Tile|α|6:0}} [[Sturgeon]] | | {{Tile|α|6:0}} [[Sturgeon]] | ||
| + | | style="text-align:center;"|[[File:sturgeon_sprite.png]] | ||
| {{check}} || {{check}} || | | {{check}} || {{check}} || | ||
|- | |- | ||
| {{Tile|S|7:0}} [[Tiger shark]] | | {{Tile|S|7:0}} [[Tiger shark]] | ||
| + | | style="text-align:center;"|[[File:tiger_shark_sprite.png]] | ||
| || || {{check}} | | || || {{check}} | ||
|- | |- | ||
| {{Tile|α|3:1}} [[Swordfish]] | | {{Tile|α|3:1}} [[Swordfish]] | ||
| + | | style="text-align:center;"|[[File:swordfish_sprite.png]] | ||
| || {{check}} || {{check}} | | || {{check}} || {{check}} | ||
|- | |- | ||
| {{Tile|W|6:0}} [[Walrus]] | | {{Tile|W|6:0}} [[Walrus]] | ||
| + | | style="text-align:center;"|[[File:walrus_sprite.png]] | ||
| {{check}} || || | | {{check}} || || | ||
|- | |- | ||
| {{Tile|S|6:0}} [[Whale shark]] | | {{Tile|S|6:0}} [[Whale shark]] | ||
| + | | style="text-align:center;"|[[File:whale_shark_sprite.png]] | ||
| || || {{check}} | | || || {{check}} | ||
|- | |- | ||
| {{Tile|s|7:1}} [[Whitetip reef shark]] | | {{Tile|s|7:1}} [[Whitetip reef shark]] | ||
| + | | style="text-align:center;"|[[File:whitetip_reef_shark_sprite.png]] | ||
| || || {{check}} | | || || {{check}} | ||
|} | |} | ||
| Line 196: | Line 256: | ||
{| class="wikitable" | {| class="wikitable" | ||
! Name | ! Name | ||
| + | ! Graphic | ||
! Arctic ocean !! Temperate ocean !! Tropical ocean | ! Arctic ocean !! Temperate ocean !! Tropical ocean | ||
|- | |- | ||
| {{Tile|a|7:1}} [[Albatross man]] | | {{Tile|a|7:1}} [[Albatross man]] | ||
| + | | style="text-align:center;"|[[File:albatross_man_sprite.png]] | ||
| {{check}} || {{check}} || {{check}} | | {{check}} || {{check}} || {{check}} | ||
|- | |- | ||
| {{Tile|c|4:1}} [[Crab man]] | | {{Tile|c|4:1}} [[Crab man]] | ||
| + | | style="text-align:center;"|[[File:crab_man_sprite.png]] | ||
| {{check}} || {{check}} || {{check}} | | {{check}} || {{check}} || {{check}} | ||
|- | |- | ||
| {{Tile|c|6:0}} [[Cuttlefish man]] | | {{Tile|c|6:0}} [[Cuttlefish man]] | ||
| + | | style="text-align:center;"|[[File:cuttlefish_man_sprite.png]] | ||
| {{check}} || {{check}} || {{check}} | | {{check}} || {{check}} || {{check}} | ||
|- | |- | ||
| {{Tile|S|6:0}} [[Elephant seal man]] | | {{Tile|S|6:0}} [[Elephant seal man]] | ||
| + | | style="text-align:center;"|[[File:elephant_seal_man_sprite.png]] | ||
| {{check}} || || | | {{check}} || || | ||
|- | |- | ||
| {{Tile|A|7:1}} [[Giant albatross]] | | {{Tile|A|7:1}} [[Giant albatross]] | ||
| + | | style="text-align:center;"|[[File:giant_albatross_sprite.png]] | ||
| {{check}} || {{check}} || {{check}} | | {{check}} || {{check}} || {{check}} | ||
|- | |- | ||
| {{Tile|C|4:1}} [[Giant crab]] | | {{Tile|C|4:1}} [[Giant crab]] | ||
| + | | style="text-align:center;"|[[File:giant_crab_sprite.png]] | ||
| {{check}} || {{check}} || {{check}} | | {{check}} || {{check}} || {{check}} | ||
|- | |- | ||
| {{Tile|C|6:0}} [[Giant cuttlefish]] | | {{Tile|C|6:0}} [[Giant cuttlefish]] | ||
| + | | style="text-align:center;"|[[File:giant_cuttlefish_sprite.png]] | ||
| {{check}} || {{check}} || {{check}} | | {{check}} || {{check}} || {{check}} | ||
|- | |- | ||
| {{Tile|S|6:0}} [[Giant elephant seal]] | | {{Tile|S|6:0}} [[Giant elephant seal]] | ||
| + | | style="text-align:center;"|[[File:giant_elephant_seal_sprite.png]] | ||
| {{check}} || || | | {{check}} || || | ||
|- | |- | ||
| {{Tile|H|7:0}} [[Giant harp seal]] | | {{Tile|H|7:0}} [[Giant harp seal]] | ||
| + | | style="text-align:center;"|[[File:giant_harp_seal_sprite.png]] | ||
| {{check}} || || | | {{check}} || || | ||
|- | |- | ||
| {{Tile|C|6:0}} [[Giant horseshoe crab]] | | {{Tile|C|6:0}} [[Giant horseshoe crab]] | ||
| + | | style="text-align:center;"|[[File:giant_horseshoe_crab_sprite.png]] | ||
| {{check}} || {{check}} || {{check}} | | {{check}} || {{check}} || {{check}} | ||
|- | |- | ||
| {{Tile|L|0:1}} [[Giant leopard seal]] | | {{Tile|L|0:1}} [[Giant leopard seal]] | ||
| + | | style="text-align:center;"|[[File:giant_leopard_seal_sprite.png]] | ||
| {{check}} || || | | {{check}} || || | ||
|- | |- | ||
| {{Tile|S|4:1}} [[Giant moon snail]] | | {{Tile|S|4:1}} [[Giant moon snail]] | ||
| + | | style="text-align:center;"|[[File:giant_moon_snail_sprite.png]] | ||
| || {{check}} || | | || {{check}} || | ||
|- | |- | ||
| {{Tile|N|7:0}} [[Giant narwhal]] | | {{Tile|N|7:0}} [[Giant narwhal]] | ||
| + | | style="text-align:center;"|[[File:giant_narwhal_sprite.png]] | ||
| {{check}} || || | | {{check}} || || | ||
|- | |- | ||
| {{Tile|N|4:1}} [[Giant nautilus]] | | {{Tile|N|4:1}} [[Giant nautilus]] | ||
| + | | style="text-align:center;"|[[File:giant_nautilus_sprite.png]] | ||
| {{check}} || {{check}} || {{check}} | | {{check}} || {{check}} || {{check}} | ||
|- | |- | ||
| {{Tile|O|7:0}} [[Giant octopus]] | | {{Tile|O|7:0}} [[Giant octopus]] | ||
| + | | style="text-align:center;"|[[File:giant_octopus_sprite.png]] | ||
| {{check}} || {{check}} || {{check}} | | {{check}} || {{check}} || {{check}} | ||
|- | |- | ||
| {{Tile|O|0:1}} [[Giant orca]] | | {{Tile|O|0:1}} [[Giant orca]] | ||
| + | | style="text-align:center;"|[[File:giant_orca_sprite.png]] | ||
| {{check}} || {{check}} || {{check}} | | {{check}} || {{check}} || {{check}} | ||
|- | |- | ||
| {{Tile|O|7:1}} [[Giant osprey]] | | {{Tile|O|7:1}} [[Giant osprey]] | ||
| + | | style="text-align:center;"|[[File:giant_osprey_sprite.png]] | ||
| {{check}} || {{check}} || {{check}} | | {{check}} || {{check}} || {{check}} | ||
|- | |- | ||
| {{Tile|P|0:1}} [[Giant penguin]] | | {{Tile|P|0:1}} [[Giant penguin]] | ||
| + | | style="text-align:center;"|[[File:giant_penguin_sprite.png]] | ||
| {{check}} || || | | {{check}} || || | ||
|- | |- | ||
| {{Tile|P|0:1}} [[Giant puffin]] | | {{Tile|P|0:1}} [[Giant puffin]] | ||
| + | | style="text-align:center;"|[[File:giant_puffin_sprite.png]] | ||
| {{check}} || || | | {{check}} || || | ||
|- | |- | ||
| {{Tile|W|7:0}} [[Giant sperm whale]] | | {{Tile|W|7:0}} [[Giant sperm whale]] | ||
| + | | style="text-align:center;"|[[File:giant_sperm_whale_sprite.png]] | ||
| {{check}} || {{check}} || {{check}} | | {{check}} || {{check}} || {{check}} | ||
|- | |- | ||
| {{Tile|S|4:1}} [[Giant sponge]] | | {{Tile|S|4:1}} [[Giant sponge]] | ||
| + | | style="text-align:center;"|[[File:giant_sponge_sprite.png]] | ||
| {{check}} || {{check}} || {{check}} | | {{check}} || {{check}} || {{check}} | ||
|- | |- | ||
| {{Tile|W|6:0}} [[Giant walrus]] | | {{Tile|W|6:0}} [[Giant walrus]] | ||
| + | | style="text-align:center;"|[[File:giant_walrus_sprite.png]] | ||
| {{check}} || || | | {{check}} || || | ||
|- | |- | ||
| {{Tile|S|7:1}} [[Gigantic squid]] | | {{Tile|S|7:1}} [[Gigantic squid]] | ||
| + | | style="text-align:center;"|[[File:gigantic_squid_sprite.png]] | ||
| {{check}} || {{check}} || {{check}} | | {{check}} || {{check}} || {{check}} | ||
|- | |- | ||
| {{Tile|h|7:0}} [[Harp seal man]] | | {{Tile|h|7:0}} [[Harp seal man]] | ||
| + | | style="text-align:center;"|[[File:harp_seal_man_sprite.png]] | ||
| {{check}} || || | | {{check}} || || | ||
|- | |- | ||
| {{Tile|c|6:0}} [[Horseshoe crab man]] | | {{Tile|c|6:0}} [[Horseshoe crab man]] | ||
| + | | style="text-align:center;"|[[File:horseshoe_crab_man_sprite.png]] | ||
| {{check}} || {{check}} || {{check}} | | {{check}} || {{check}} || {{check}} | ||
|- | |- | ||
| {{Tile|L|0:1}} [[Leopard seal man]] | | {{Tile|L|0:1}} [[Leopard seal man]] | ||
| + | | style="text-align:center;"|[[File:leopard_seal_man_sprite.png]] | ||
| {{check}} || || | | {{check}} || || | ||
|- | |- | ||
| {{Tile|s|4:1}} [[Moon snail man]] | | {{Tile|s|4:1}} [[Moon snail man]] | ||
| + | | style="text-align:center;"|[[File:moon_snail_man_sprite.png]] | ||
| || {{check}} || | | || {{check}} || | ||
|- | |- | ||
| {{Tile|N|7:0}} [[Narwhal man]] | | {{Tile|N|7:0}} [[Narwhal man]] | ||
| + | | style="text-align:center;"|[[File:narwhal_man_sprite.png]] | ||
| {{check}} || || | | {{check}} || || | ||
|- | |- | ||
| {{Tile|n|4:1}} [[Nautilus man]] | | {{Tile|n|4:1}} [[Nautilus man]] | ||
| + | | style="text-align:center;"|[[File:nautilus_man_sprite.png]] | ||
| {{check}} || {{check}} || {{check}} | | {{check}} || {{check}} || {{check}} | ||
|- | |- | ||
| {{Tile|o|7:0}} [[Octopus man]] | | {{Tile|o|7:0}} [[Octopus man]] | ||
| + | | style="text-align:center;"|[[File:octopus_man_sprite.png]] | ||
| {{check}} || {{check}} || {{check}} | | {{check}} || {{check}} || {{check}} | ||
|- | |- | ||
| {{Tile|O|0:1}} [[Orca man]] | | {{Tile|O|0:1}} [[Orca man]] | ||
| + | | style="text-align:center;"|[[File:orca_man_sprite.png]] | ||
| {{check}} || {{check}} || {{check}} | | {{check}} || {{check}} || {{check}} | ||
|- | |- | ||
| {{Tile|o|7:1}} [[Osprey man]] | | {{Tile|o|7:1}} [[Osprey man]] | ||
| + | | style="text-align:center;"|[[File:osprey_man_sprite.png]] | ||
| {{check}} || {{check}} || {{check}} | | {{check}} || {{check}} || {{check}} | ||
|- | |- | ||
| {{Tile|p|0:1}} [[Penguin man]] | | {{Tile|p|0:1}} [[Penguin man]] | ||
| + | | style="text-align:center;"|[[File:penguin_man_sprite.png]] | ||
| {{check}} || || | | {{check}} || || | ||
|- | |- | ||
| {{Tile|p|0:1}} [[Puffin man]] | | {{Tile|p|0:1}} [[Puffin man]] | ||
| + | | style="text-align:center;"|[[File:puffin_man_sprite.png]] | ||
| {{check}} || || | | {{check}} || || | ||
|- | |- | ||
| {{Tile|S|3:1}} [[Sea serpent]] | | {{Tile|S|3:1}} [[Sea serpent]] | ||
| + | | style="text-align:center;"|[[File:sea_serpent_sprite.png]] | ||
| {{check}} || {{check}} || {{check}} | | {{check}} || {{check}} || {{check}} | ||
|- | |- | ||
| {{Tile|W|7:0}} [[Sperm whale man]] | | {{Tile|W|7:0}} [[Sperm whale man]] | ||
| + | | style="text-align:center;"|[[File:sperm_whale_man_sprite.png]] | ||
| {{check}} || {{check}} || {{check}} | | {{check}} || {{check}} || {{check}} | ||
|- | |- | ||
| {{Tile|s|4:1}} [[Sponge man]] | | {{Tile|s|4:1}} [[Sponge man]] | ||
| + | | style="text-align:center;"|[[File:sponge_man_sprite.png]] | ||
| {{check}} || {{check}} || {{check}} | | {{check}} || {{check}} || {{check}} | ||
|- | |- | ||
| {{Tile|s|7:1}} [[Squid man]] | | {{Tile|s|7:1}} [[Squid man]] | ||
| + | | style="text-align:center;"|[[File:squid_man_sprite.png]] | ||
| {{check}} || {{check}} || {{check}} | | {{check}} || {{check}} || {{check}} | ||
|- | |- | ||
| {{Tile|W|6:0}} [[Walrus man]] | | {{Tile|W|6:0}} [[Walrus man]] | ||
| + | | style="text-align:center;"|[[File:walrus_man_sprite.png]] | ||
| {{check}} || || | | {{check}} || || | ||
|} | |} | ||
| Line 319: | Line 419: | ||
{| class="wikitable" | {| class="wikitable" | ||
! Name | ! Name | ||
| + | ! Graphic | ||
! Arctic ocean !! Temperate ocean !! Tropical ocean | ! Arctic ocean !! Temperate ocean !! Tropical ocean | ||
|- | |- | ||
| {{Tile|M|3:1}} [[Merperson]] | | {{Tile|M|3:1}} [[Merperson]] | ||
| + | | style="text-align:center;"|[[File:merperson_sprite_anim.gif]] | ||
| {{check}} || {{check}} || {{check}} | | {{check}} || {{check}} || {{check}} | ||
|} | |} | ||
| Line 328: | Line 430: | ||
{| class="wikitable" | {| class="wikitable" | ||
! Name | ! Name | ||
| + | ! Graphic | ||
! Arctic ocean !! Temperate ocean !! Tropical ocean | ! Arctic ocean !! Temperate ocean !! Tropical ocean | ||
|- | |- | ||
| {{Tile|M|0:1}} [[Sea monster]] | | {{Tile|M|0:1}} [[Sea monster]] | ||
| + | | style="text-align:center;"|[[File:sea_monster_sprite.png]] | ||
| {{check}} || {{check}} || {{check}} | | {{check}} || {{check}} || {{check}} | ||
|} | |} | ||
| Line 337: | Line 441: | ||
{| class="wikitable" | {| class="wikitable" | ||
! Name | ! Name | ||
| + | ! Graphic | ||
! Arctic ocean !! Temperate ocean !! Tropical ocean | ! Arctic ocean !! Temperate ocean !! Tropical ocean | ||
|- | |- | ||
| {{Tile|α|7:1}} [[Anchovy]] | | {{Tile|α|7:1}} [[Anchovy]] | ||
| + | | style="text-align:center;"|[[File:anchovy_sprite.png]] | ||
| || {{check}} || | | || {{check}} || | ||
|- | |- | ||
| {{Tile|ò|0:1}} [[Bat ray]] | | {{Tile|ò|0:1}} [[Bat ray]] | ||
| + | | style="text-align:center;"|[[File:bat_ray_sprite.png]] | ||
| || {{check}} || {{check}} | | || {{check}} || {{check}} | ||
|- | |- | ||
| {{Tile|~|3:0}} [[Brook lamprey]] | | {{Tile|~|3:0}} [[Brook lamprey]] | ||
| + | | style="text-align:center;"|[[File:brook_lamprey_sprite.png]] | ||
| || {{check}} || | | || {{check}} || | ||
|- | |- | ||
| {{Tile|α|4:1}} [[Clownfish]] | | {{Tile|α|4:1}} [[Clownfish]] | ||
| + | | style="text-align:center;"|[[File:clownfish_sprite.png]] | ||
| || || {{check}} | | || || {{check}} | ||
|- | |- | ||
| {{Tile|♂|6:0}} [[Cuttlefish]] | | {{Tile|♂|6:0}} [[Cuttlefish]] | ||
| + | | style="text-align:center;"|[[File:cuttlefish_sprite.png]] | ||
| {{check}} || {{check}} || {{check}} | | {{check}} || {{check}} || {{check}} | ||
|- | |- | ||
| {{Tile|α|6:0}} [[Flounder]] | | {{Tile|α|6:0}} [[Flounder]] | ||
| + | | style="text-align:center;"|[[File:flounder_sprite.png]] | ||
| || {{check}} || | | || {{check}} || | ||
|- | |- | ||
| {{Tile|α|4:1}} [[Glasseye]] | | {{Tile|α|4:1}} [[Glasseye]] | ||
| + | | style="text-align:center;"|[[File:glasseye_sprite.png]] | ||
| || || {{check}} | | || || {{check}} | ||
|- | |- | ||
| {{Tile|~|6:0}} [[Hagfish]] | | {{Tile|~|6:0}} [[Hagfish]] | ||
| + | | style="text-align:center;"|[[File:hagfish_sprite.png]] | ||
| {{check}} || {{check}} || | | {{check}} || {{check}} || | ||
|- | |- | ||
| {{Tile|α|7:1}} [[Hake]] | | {{Tile|α|7:1}} [[Hake]] | ||
| + | | style="text-align:center;"|[[File:hake_sprite.png]] | ||
| {{check}} || {{check}} || | | {{check}} || {{check}} || | ||
|- | |- | ||
| {{Tile|α|3:1}} [[Herring]] | | {{Tile|α|3:1}} [[Herring]] | ||
| + | | style="text-align:center;"|[[File:herring_sprite.png]] | ||
| {{check}} || {{check}} || | | {{check}} || {{check}} || | ||
|- | |- | ||
| {{Tile|α|7:0}} [[Mackerel]] | | {{Tile|α|7:0}} [[Mackerel]] | ||
| + | | style="text-align:center;"|[[File:mackerel_sprite.png]] | ||
| {{check}} || {{check}} || | | {{check}} || {{check}} || | ||
|- | |- | ||
| {{Tile|∙|4:1}} [[Moon snail]] | | {{Tile|∙|4:1}} [[Moon snail]] | ||
| + | | style="text-align:center;"|[[File:moon_snail_sprite.png]] | ||
| || {{check}} || | | || {{check}} || | ||
|- | |- | ||
| {{Tile|m|7:1}} [[Mussel]] | | {{Tile|m|7:1}} [[Mussel]] | ||
| + | | style="text-align:center;"|[[File:mussel_sprite.png]] | ||
| {{check}} || {{check}} || {{check}} | | {{check}} || {{check}} || {{check}} | ||
|- | |- | ||
| {{Tile|♂|4:1}} [[Nautilus]] | | {{Tile|♂|4:1}} [[Nautilus]] | ||
| + | | style="text-align:center;"|[[File:nautilus_sprite.png]] | ||
| {{check}} || {{check}} || {{check}} | | {{check}} || {{check}} || {{check}} | ||
|- | |- | ||
| {{Tile|o|7:1}} [[Oyster]] | | {{Tile|o|7:1}} [[Oyster]] | ||
| + | | style="text-align:center;"|[[File:oyster_sprite.png]] | ||
| {{check}} || {{check}} || {{check}} | | {{check}} || {{check}} || {{check}} | ||
|- | |- | ||
| {{Tile|α|4:1}} [[Salmon]] | | {{Tile|α|4:1}} [[Salmon]] | ||
| + | | style="text-align:center;"|[[File:salmon_sprite.png]] | ||
| || {{check}} || | | || {{check}} || | ||
|- | |- | ||
| {{Tile|Ω|6:0}} [[Sea nettle jellyfish]] | | {{Tile|Ω|6:0}} [[Sea nettle jellyfish]] | ||
| + | | style="text-align:center;"|[[File:sea_nettle_jellyfish_sprite.png]] | ||
| || {{check}} || | | || {{check}} || | ||
|- | |- | ||
| {{Tile|α|2:0}} [[Seahorse]] | | {{Tile|α|2:0}} [[Seahorse]] | ||
| + | | style="text-align:center;"|[[File:seahorse_sprite.png]] | ||
| || {{check}} || {{check}} | | || {{check}} || {{check}} | ||
|- | |- | ||
| {{Tile|α|3:1}} [[Shad]] | | {{Tile|α|3:1}} [[Shad]] | ||
| + | | style="text-align:center;"|[[File:shad_sprite.png]] | ||
| {{check}} || {{check}} || | | {{check}} || {{check}} || | ||
|- | |- | ||
| {{Tile|α|6:0}} [[Sole]] | | {{Tile|α|6:0}} [[Sole]] | ||
| + | | style="text-align:center;"|[[File:sole_sprite.png]] | ||
| {{check}} || {{check}} || | | {{check}} || {{check}} || | ||
|- | |- | ||
| {{Tile|α|6:0}} [[Spotted ratfish]] | | {{Tile|α|6:0}} [[Spotted ratfish]] | ||
| + | | style="text-align:center;"|[[File:spotted_ratfish_sprite.png]] | ||
| || {{check}} || | | || {{check}} || | ||
|- | |- | ||
| {{Tile|♂|7:1}} [[Squid]] | | {{Tile|♂|7:1}} [[Squid]] | ||
| + | | style="text-align:center;"|[[File:squid_sprite.png]] | ||
| {{check}} || {{check}} || {{check}} | | {{check}} || {{check}} || {{check}} | ||
|- | |- | ||
| {{Tile|α|3:1}} [[Steelhead trout]] | | {{Tile|α|3:1}} [[Steelhead trout]] | ||
| + | | style="text-align:center;"|[[File:steelhead_trout_sprite.png]] | ||
| {{check}} || {{check}} || | | {{check}} || {{check}} || | ||
|- | |- | ||
| {{Tile|ò|6:0}} [[Thornback ray]] | | {{Tile|ò|6:0}} [[Thornback ray]] | ||
| + | | style="text-align:center;"|[[File:thornback_ray_sprite.png]] | ||
| || {{check}} || {{check}} | | || {{check}} || {{check}} | ||
|- | |- | ||
| {{Tile|α|7:0}} [[White-spotted puffer]] | | {{Tile|α|7:0}} [[White-spotted puffer]] | ||
| + | | style="text-align:center;"|[[File:white_spotted_puffer_sprite.png]] | ||
| || || {{check}} | | || || {{check}} | ||
|} | |} | ||
| Line 418: | Line 548: | ||
{| class="wikitable" | {| class="wikitable" | ||
! Name | ! Name | ||
| + | ! Graphic | ||
! Arctic ocean !! Temperate ocean !! Tropical ocean | ! Arctic ocean !! Temperate ocean !! Tropical ocean | ||
|- | |- | ||
| {{Tile|∙|6:1}} [[Fairy]] | | {{Tile|∙|6:1}} [[Fairy]] | ||
| + | | style="text-align:center;"|[[File:fairy_sprite.png]] | ||
| {{check}} || {{check}} || {{check}} | | {{check}} || {{check}} || {{check}} | ||
|- | |- | ||
| {{Tile|·|3:1}} [[Pixie]] | | {{Tile|·|3:1}} [[Pixie]] | ||
| + | | style="text-align:center;"|[[File:pixie_sprite_anim.gif]] | ||
| {{check}} || {{check}} || {{check}} | | {{check}} || {{check}} || {{check}} | ||
|} | |} | ||
| − | |||
== Starting on an arctic ocean == | == Starting on an arctic ocean == | ||
| − | While by default it's impossible to [[embark]] in an ocean biome exclusively, [[DFHack]] offers an option to bypass this restriction. However, out of the three ocean biomes, only the arctic ocean | + | While by default it's impossible to [[embark]] in an ocean biome exclusively, [[DFHack]] offers an option to bypass this restriction. However, out of the three ocean biomes, only the arctic ocean can be feasibly embarked on, having a frozen surface year-round; although it is possible to choose a site that contains other oceanic biomes as well and expand over water or undeground. As it offers few resources, having only a thick layer of [[ice]] with deep [[water]] underneath it, surviving in this biome may prove to be very difficult, and should be reserved for a challenge only. |
=== Pre-embark === | === Pre-embark === | ||
You have to disable [[cave-in]]s in [[d_init.txt]] and keep them this way all the time. As the map edges do not provide support for the ice sheet, it would otherwise collapse into the water below, [[Fun|killing everyone in the resulting mayhem]]. | You have to disable [[cave-in]]s in [[d_init.txt]] and keep them this way all the time. As the map edges do not provide support for the ice sheet, it would otherwise collapse into the water below, [[Fun|killing everyone in the resulting mayhem]]. | ||
| − | Alternatively, send in a sacrificial group for the first embark and allow the surface ice to cave in and kill everyone, then reclaim the site. | + | Alternatively, send in a sacrificial group for the first embark and allow the surface ice to cave in and kill everyone, then reclaim the site. This has the added quirk of creating solid ice all the way down to the ocean floor, which lowers the difficulty immensely. |
=== Embark build === | === Embark build === | ||
| − | The frozen surface of the ocean offers nothing but ice and salt water, therefore requiring you to bring all the necessary supplies with yourself. Here is a comprehensive list of what you will need: | + | The frozen surface of the ocean offers nothing but [[ice]] and salt water, therefore requiring you to bring all the necessary supplies with yourself. Here is a comprehensive list of what you will need: |
| − | * [[Sand]] - If your civilization has access to [[bituminous coal]] or [[lignite]], [[green glass]] is the most cost-efficient material to make items out of. If not, bring a lot of [[stone]] | + | * [[Sand]] - If your civilization has access to [[bituminous coal]] or [[lignite]], [[green glass]] is the most cost-efficient material to make items out of. If not, bring a lot of [[wood]] instead, as stone can be mined out of the ocean floor, assuming there is an area that is solid ice down to the bottom. [[Ice]] can also be used for construction. |
* [[Brewing|Brewable]] [[fruit]]s - While [[booze]] can be chosen on embark, fruits give five times as much for the same price. In addition, choosing brewable items instead of booze will allow you the freedom to retire your fort if you so desire, as they won't get wasted instantly even if the game dumps them all out of their containers. They come up in bags but can't be brewed as such{{bug|7423}}, requiring you to dump them out beforehand. They can, however, be eaten by dwarves, requiring you to make a large supply of [[pot]]s early to brew all of them as soon as possible, or to forbid them so they won't be touched until you want them brewed. If you like to switch between fortresses via retire/unretire, brew sparingly so you don't waste the items, and forbid what you don't immediately need to use. Buy at least one of each type of booze at embark anyway, as they come in barrels, which you'll want for brewing. | * [[Brewing|Brewable]] [[fruit]]s - While [[booze]] can be chosen on embark, fruits give five times as much for the same price. In addition, choosing brewable items instead of booze will allow you the freedom to retire your fort if you so desire, as they won't get wasted instantly even if the game dumps them all out of their containers. They come up in bags but can't be brewed as such{{bug|7423}}, requiring you to dump them out beforehand. They can, however, be eaten by dwarves, requiring you to make a large supply of [[pot]]s early to brew all of them as soon as possible, or to forbid them so they won't be touched until you want them brewed. If you like to switch between fortresses via retire/unretire, brew sparingly so you don't waste the items, and forbid what you don't immediately need to use. Buy at least one of each type of booze at embark anyway, as they come in barrels, which you'll want for brewing. | ||
* [[Stone]] - Mainly for [[mechanism]]s and [[block]]s. Should be enough for a line of [[cage trap]]s in your fortress entrance. [[Cage]]s themselves can be made out of glass. | * [[Stone]] - Mainly for [[mechanism]]s and [[block]]s. Should be enough for a line of [[cage trap]]s in your fortress entrance. [[Cage]]s themselves can be made out of glass. | ||
| − | * [[Wood]] - For [[bed]]s, because your dwarves have to sleep somewhere. Not recommended for anything else, because it may get damaged by low temperatures. | + | * [[Wood]] - For [[bed]]s, because your dwarves have to sleep somewhere. Not recommended for anything else, because it may get damaged by low temperatures. If you do not have access to [[bituminous coal]] or [[lignite]], this is your main source of fuel until you find magma. |
* [[Ore]] - For [[weapon]]s, necessary for hunting down wildlife, and to establish a basic defense, preferably made of [[bronze]] or [[bismuth bronze]], but use [[copper]] if you lack the necessary ingredients. [[Iron]] ores are four times as expensive, and you can always request them from the [[caravan]] later on. | * [[Ore]] - For [[weapon]]s, necessary for hunting down wildlife, and to establish a basic defense, preferably made of [[bronze]] or [[bismuth bronze]], but use [[copper]] if you lack the necessary ingredients. [[Iron]] ores are four times as expensive, and you can always request them from the [[caravan]] later on. | ||
| − | * [[Egg production|Poultry]] - An efficient and reliable food source. Eggs are laid in [[nest box]]es and have to be [[cooking|cooked]] to be edible. | + | * [[Egg production|Poultry]] - An efficient and reliable food source. Eggs are laid in [[nest box]]es and have to be [[cooking|cooked]] to be edible. Can also be bred and slaughtered for [[meat]], [[tallow]], [[skin]], and [[bone]], which in turn can be used to craft crossbows, bolts, and basic armor. |
| − | * [[Milk]] - Comes in barrels and costs less than wood. Buy one of each type instead of buying logs for barrels to save a few points on embark. | + | * [[Milk]] - Comes in barrels and costs less than wood. Buy one of each type instead of buying logs for barrels to save a few points on embark. At z-level 101 or higher in arctic ocean biomes, milk freezes and remains usable even if dumped out by retiring; prepared meals with frozen milk as the solid ingredient likewise do not melt. |
* One [[anvil]], so you don't have to wait for the caravan before you can [[forge]] anything. | * One [[anvil]], so you don't have to wait for the caravan before you can [[forge]] anything. | ||
| Line 456: | Line 588: | ||
This is arguably the most difficult part, as the salt water is unsuitable for drinking and will freeze if you try to [[screw pump|pump it out]] to desalinate it. In general, the only available drink is [[booze]], and the only source of it is the dwarven [[caravan]], as no other civilizations will travel through the ocean. Manage your supplies carefully. | This is arguably the most difficult part, as the salt water is unsuitable for drinking and will freeze if you try to [[screw pump|pump it out]] to desalinate it. In general, the only available drink is [[booze]], and the only source of it is the dwarven [[caravan]], as no other civilizations will travel through the ocean. Manage your supplies carefully. | ||
| − | You could also build a well. | + | You could also build a well. If you dig deep enough, retiring and unretiring will cause your tunnels to fill with water. Furthermore, you do not need to choose a site that is wholly an arctic ocean biome. Pick a location with warmer waters as well as permanent ice, and you can have water for at least part of the year. |
| + | [[File:ocean_preview.png|thumb|360px|center|Though beautiful, still tastes like salt.]] | ||
{{Translation | {{Translation | ||
Latest revision as of 06:27, 14 February 2024
v50.13 · v0.47.05 This article is about the current version of DF.Note that some content may still need to be updated. |

An ocean is an immense volume of salt water. Oceans are often bordered by sandy beaches, where driftwood can be found. Marshes and swamps also tend to form around oceanic coastlines, especially near rivers. The land surrounding oceans also tends to have a high water table, resulting in aquifers close to the surface.
Oceans are an excellent source of food for a new fortress, usually having tons of fish, and contain shell-bearing creatures like oysters and mussels. However, sometimes when you embark on a coast, you might receive announcements like "There is nothing to catch in <some area>". If this happens, you won't be able to fish in the ocean in this embark; you may wish to abandon the fort and start again elsewhere.
There are three varieties of oceans, based on temperature, which affects the sea life found there: Arctic, Temperate and Tropical. Oceans in a freezing climate (usually arctic oceans) will freeze, just like rivers and pools, acting like a glacier.
While by default it's impossible to embark in an ocean biome exclusively, DFHack offers an option to bypass this restriction. However, in order to found a fort, one must also embark on a site that is at least partly Arctic ocean, to provide ice for an initial foothold.
Ocean waves[edit]

Waves will periodically wash over the coast - the tiles will not get wet. However, if a wave washes over a staircase, the floors below it will be slowly flooded. Cave moss will not grow in the mud left by salt water. The waves move over all natural tiles, and seem to move independently of constructed tiles like walls and floors. Be mindful not to carve away natural walls and allow tide to enter your fort, and cause excess slowdown. Sea walls can be built to block waves and protect beach areas, but need to be completely closed off to be effective. Waves also have a tendency to move items left on the beach, so it is inadvisable to place stockpiles too close to the shore—also beware that this effect means that dwarves can be knocked unconscious if hit by driftwood washed in from waves.
Since ocean waves do not actually move the water in the tiles below them, they do not create flow. Thus, waves cannot power a water wheel, making tidal energy generation much more difficult.
In adventure mode, being pushed by ocean waves occasionally increases swimming skill without the risk of drowning.
The formation of an ocean wave. (All of these images are in ASCII mode.)
The wave rises higher out of the water.
The wave crashes onto the beach.
The mist from the wave disperses.
The wave leaves behind just a puddle.


Ocean floor geology[edit]
The ocean floor will be made up of entire layers of, or combinations of, the following:
- A sedimentary layer of conglomerate, limestone, sandstone, or shale
- A soil layer of calcareous ooze, pelagic clay, or siliceous ooze
- Sand of any variety, often in small patches alongside the sedimentary or soil layers
Most of these layers also support aquifers, which are saltwater like the surrounding ocean, making the extraction of these materials rather difficult in fortress mode. Limestone is a notable exception, making it ideal for excavation from below since it is also a flux material.
Resources[edit]
Almost all tiles next to oceans have aquifers, which require fairly complicated schemes to sidestep. In addition, oceans are salt water resources, requiring desalination with a screw pump into a cistern to use for drinking. On the other hand, you have an inexhaustible source of water for fishing, drowning chambers, and so forth, as well as a spawning point for some very big and very meat-profitable creatures: sperm whales, orcas, and the like.
Wildlife[edit]
In arctic oceans, with a by-definition freezing climate, none of the aquatic vermin or creatures will be present when the water freezes over. This leaves only terrestrial and amphibious animals to appear, because they are able to live on land.
Creatures[edit]
| Name | Graphic | Arctic ocean | Temperate ocean | Tropical ocean |
|---|---|---|---|---|
a Albatross
|
✔ | ✔ | ✔ | |
s Angelshark
|
✔ | ✔ | ||
S Basking shark
|
✔ | |||
s Blacktip reef shark
|
✔ | |||
S Blue shark
|
✔ | ✔ | ✔ | |
α Bluefin tuna
|
✔ | ✔ | ✔ | |
α Bluefish
|
✔ | ✔ | ||
S Bull shark
|
✔ | |||
α Cod
|
✔ | ✔ | ||
C Coelacanth
|
✔ | |||
ò |